Tennis Photography 101
Published 10 March 2026 by MPB
As with playing the sport itself, tennis photography, whether you’re shooting at your local tennis club or at a Grand Slam, takes patience and craft to master. Testing your skills and learning how to freeze a serve, follow a rally or catch that perfect point-winning reaction is what makes one tennis photographer stand out from the rest. You’ll find everything you need to get started here, including gear advice, camera settings, shooting etiquette and taking your first steps into the career.
We combine our perspective with exclusive insights from Getty Images sports photographer Matthew Stockman, one of the most experienced tennis photographers working today.

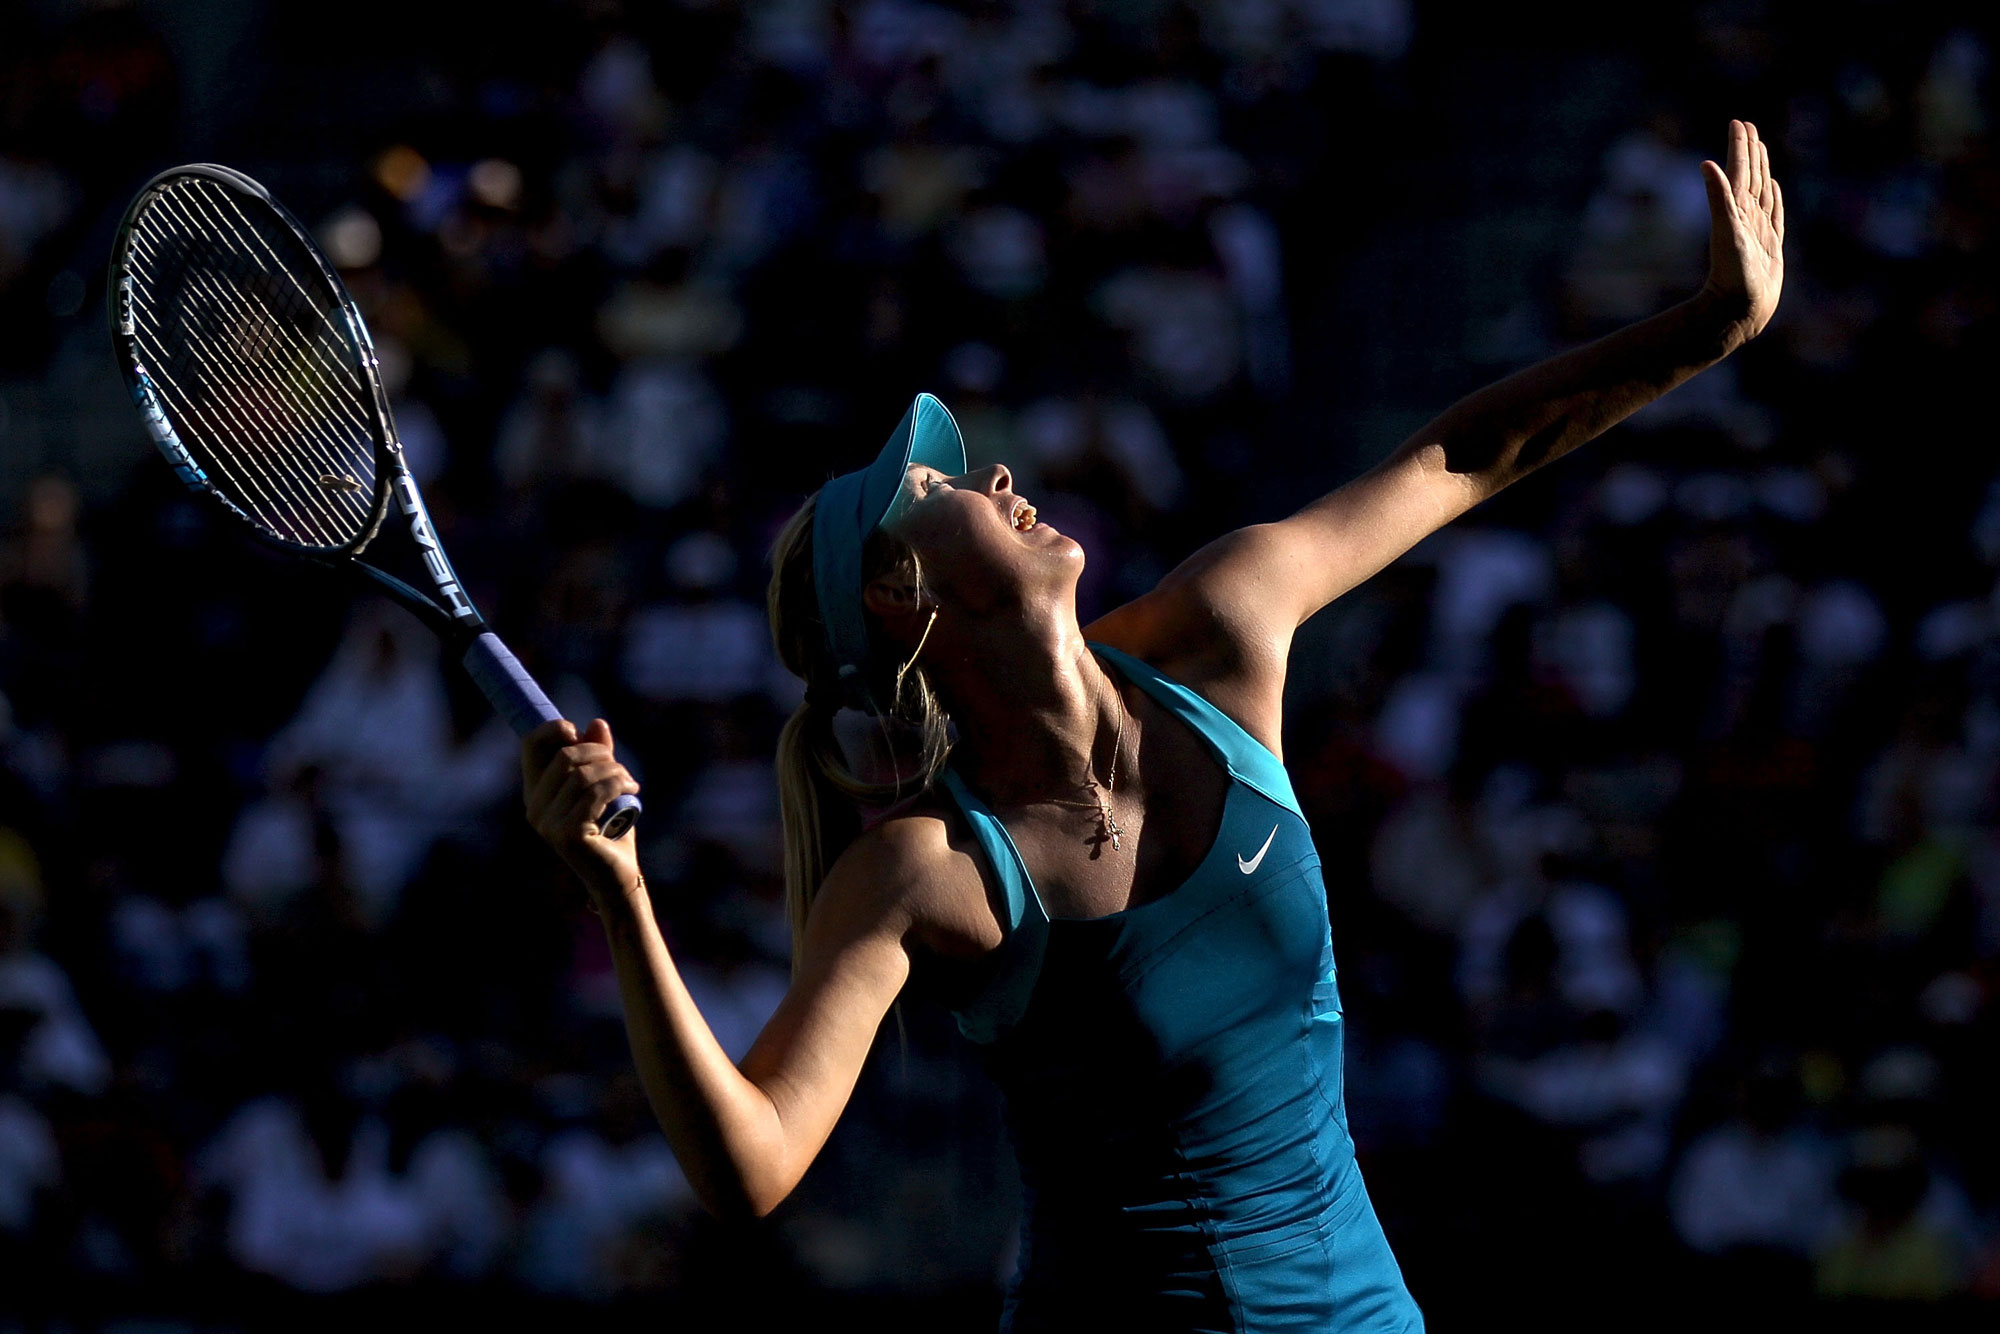
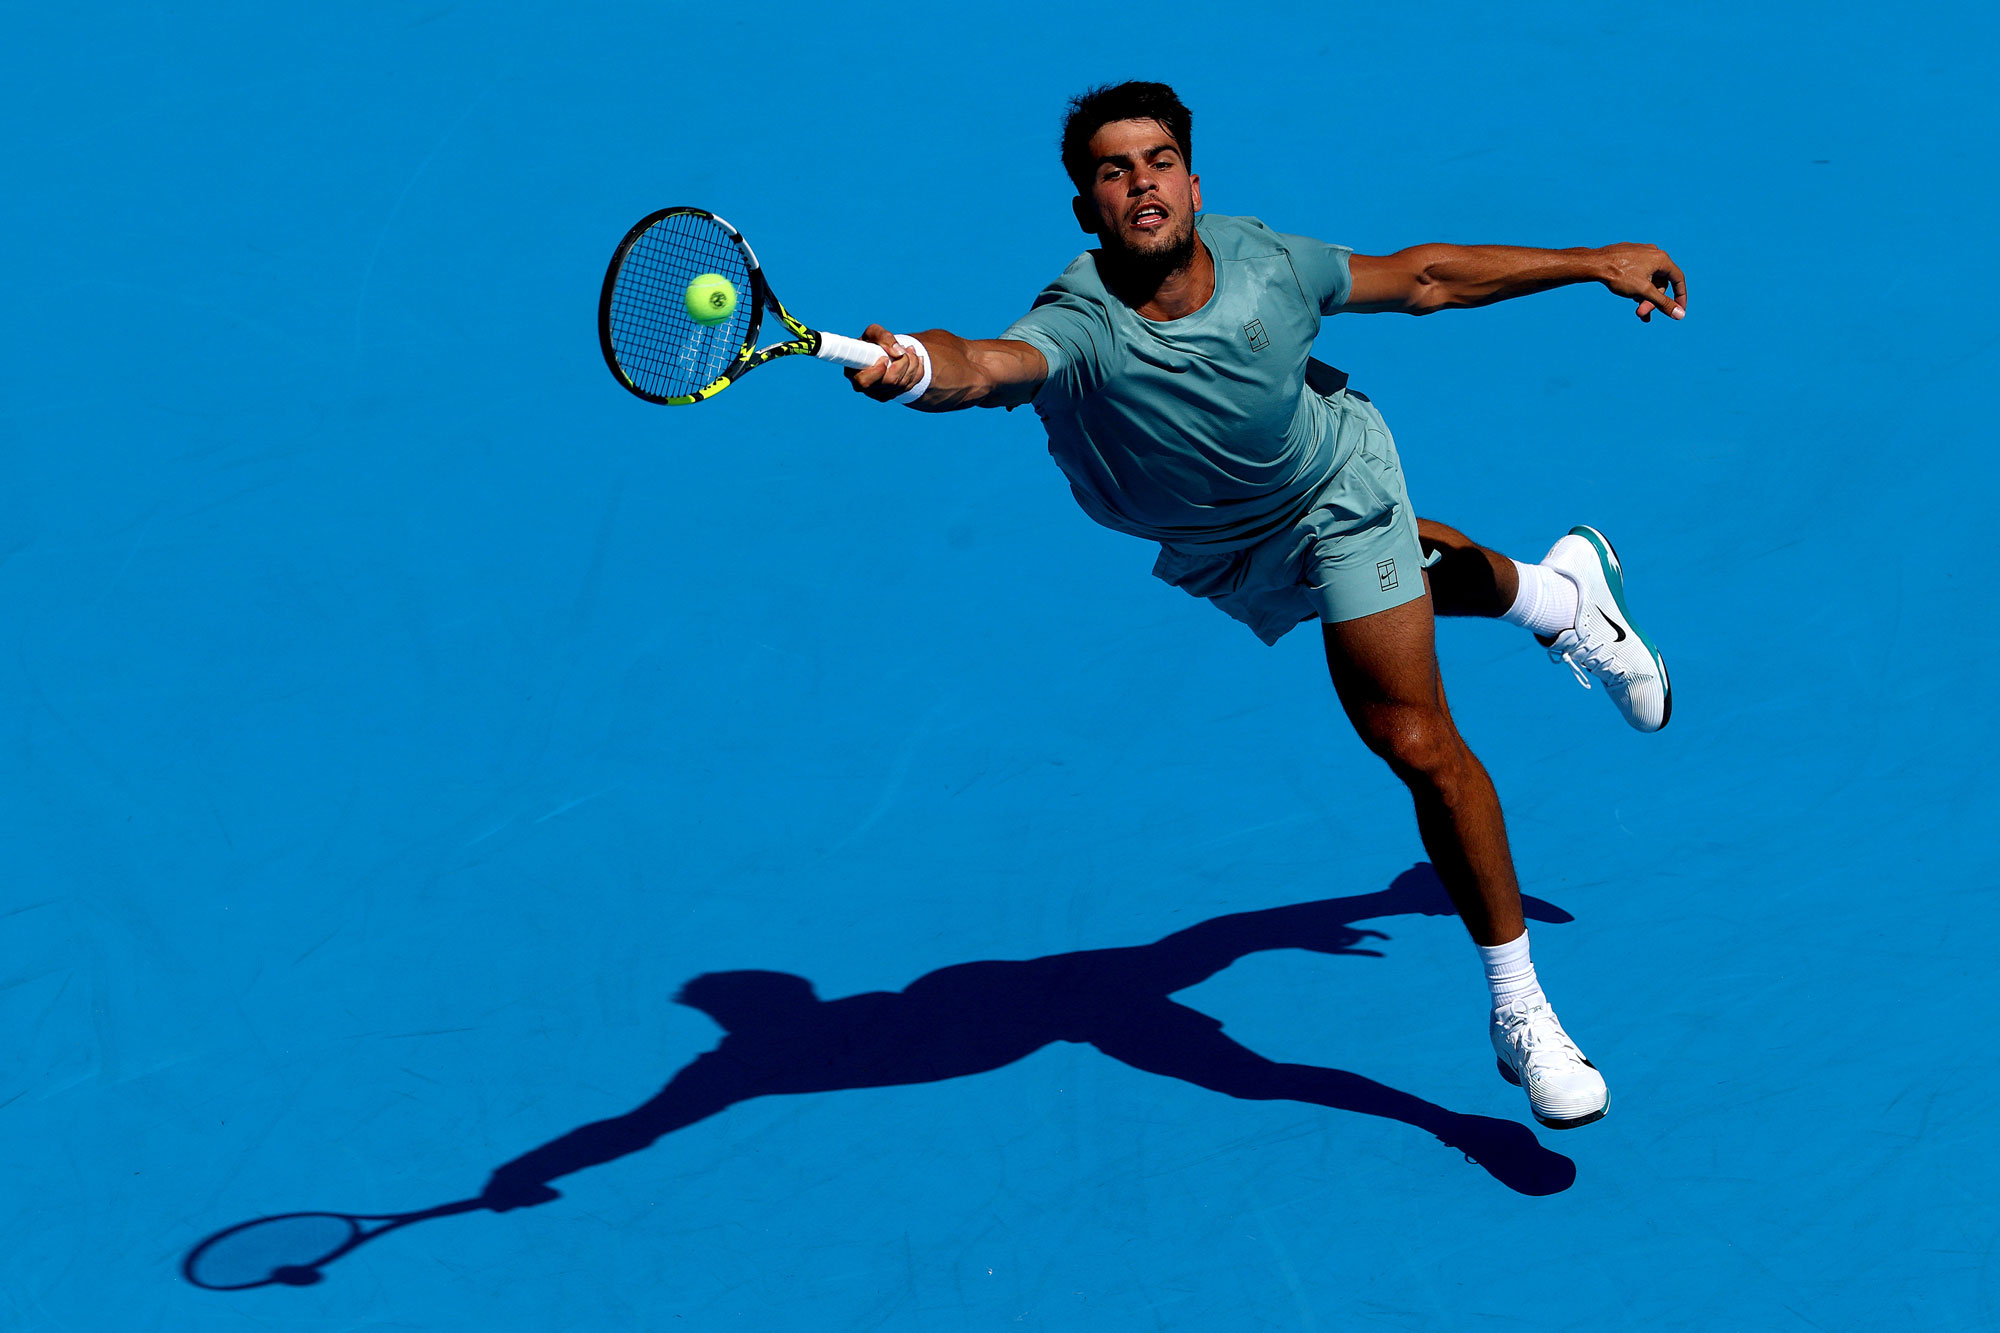
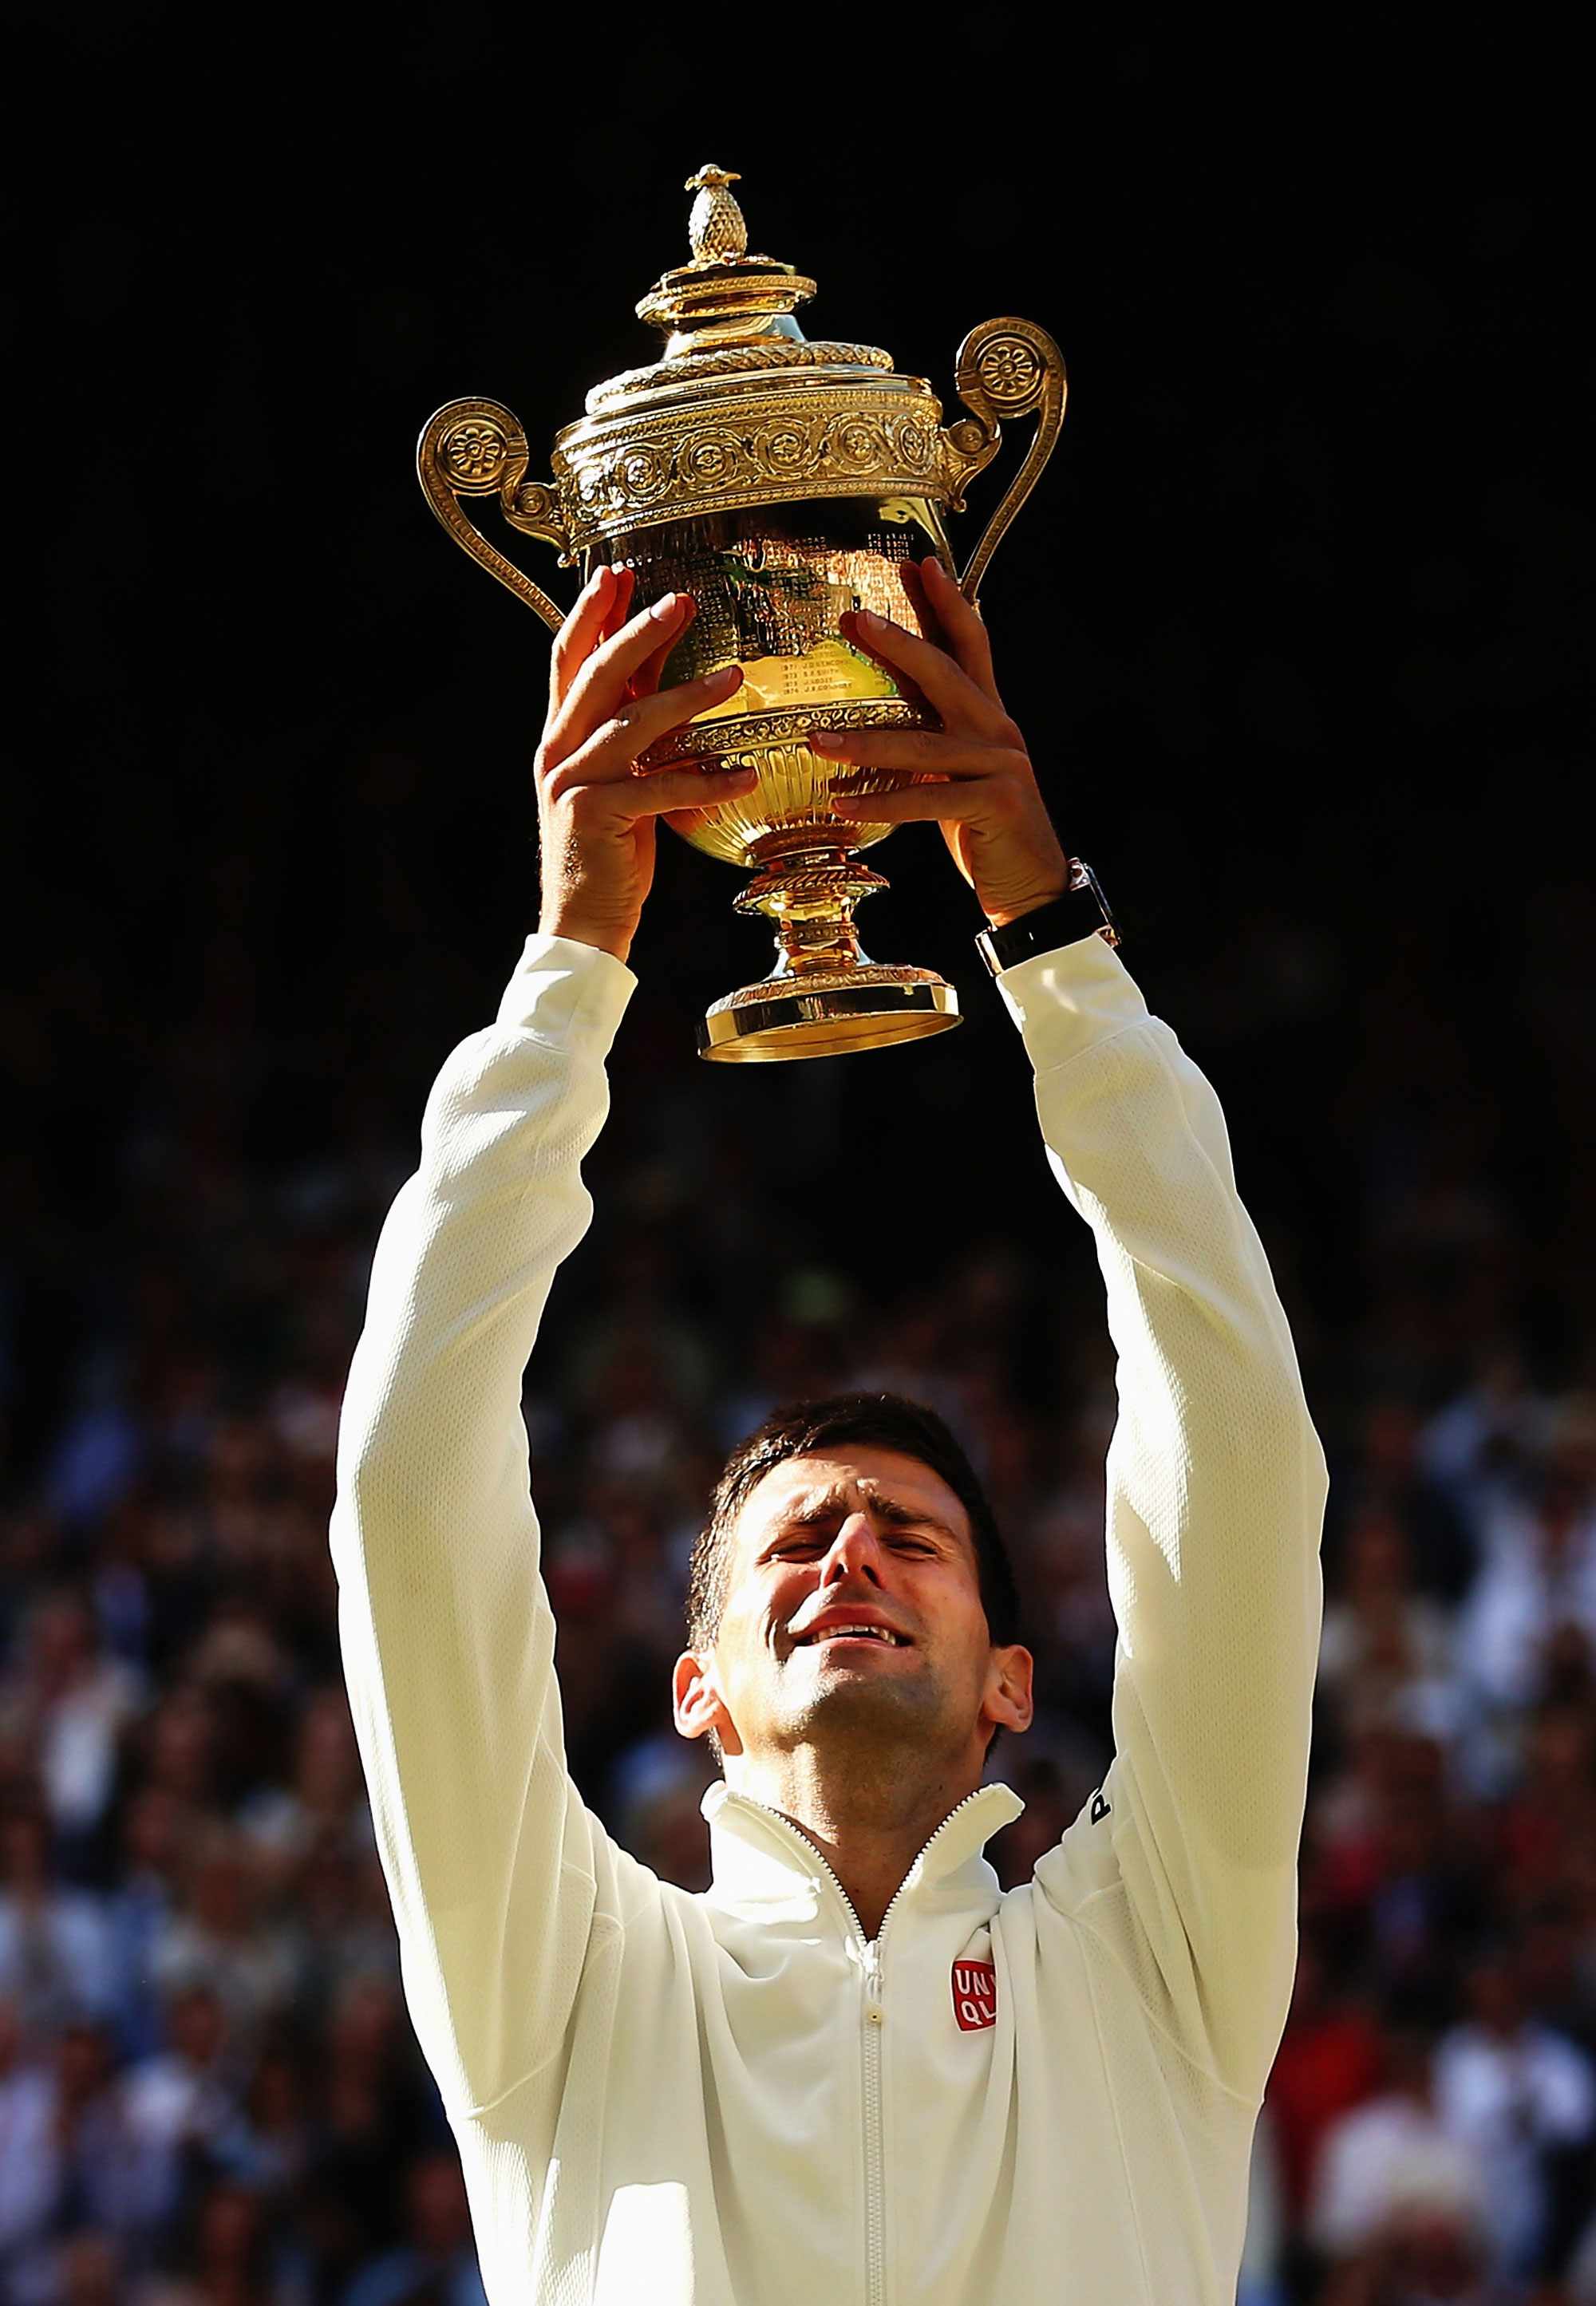
Matthew Stockman (Getty Images) | Canon EOS-1D X | EF 70-200mm f/2.8L IS II USM | 95mm | f/3.5 | 1/2000 | ISO 320
About Matthew Stockman
Matthew Stockman was born and raised in Iowa City, Iowa, studying photojournalism at Western Kentucky University. He began his career at Inside Sports magazine and Century Publishing Company in Chicago before joining the Allsport USA photographic agency in Los Angeles in 1994, first as an editor and later, you guessed it, as a photographer. Allsport would eventually become the world-renowned Getty Images, where Matthew established himself as a leading tennis specialist.
Over the course of his career, he has covered more than 30 Grand Slams, the Olympics, ATP/WTA tours, major international championships and sporting events of every scale. His work has taken him all over the world. Matthew now resides in Denver, Colorado and serves on the advisory board of the Doug Pensinger Photography Fund, where he continues to support the next generation of photojournalists.
What Is Tennis Photography?
The focus of tennis photography is to capture players in action and the quieter moments that tell the story of a match. Coaches in the box, fans in the stands and the general atmosphere of the grounds all build a narrative. When you photograph your first match, you’ll notice the length of the games and the constantly changing light. The fast-paced movement of the ball and the players requires high shutter speeds, and the repetitiveness of the game makes your timing as a photographer really matter.
Being a good tennis photographer often requires going beyond the obvious action of the game and capturing images that convey the emotions and tension. Can you get a shot that makes the viewer feel like they’re immersed in the action? Can you keep up? We’ll help you walk into your first shoot with confidence.
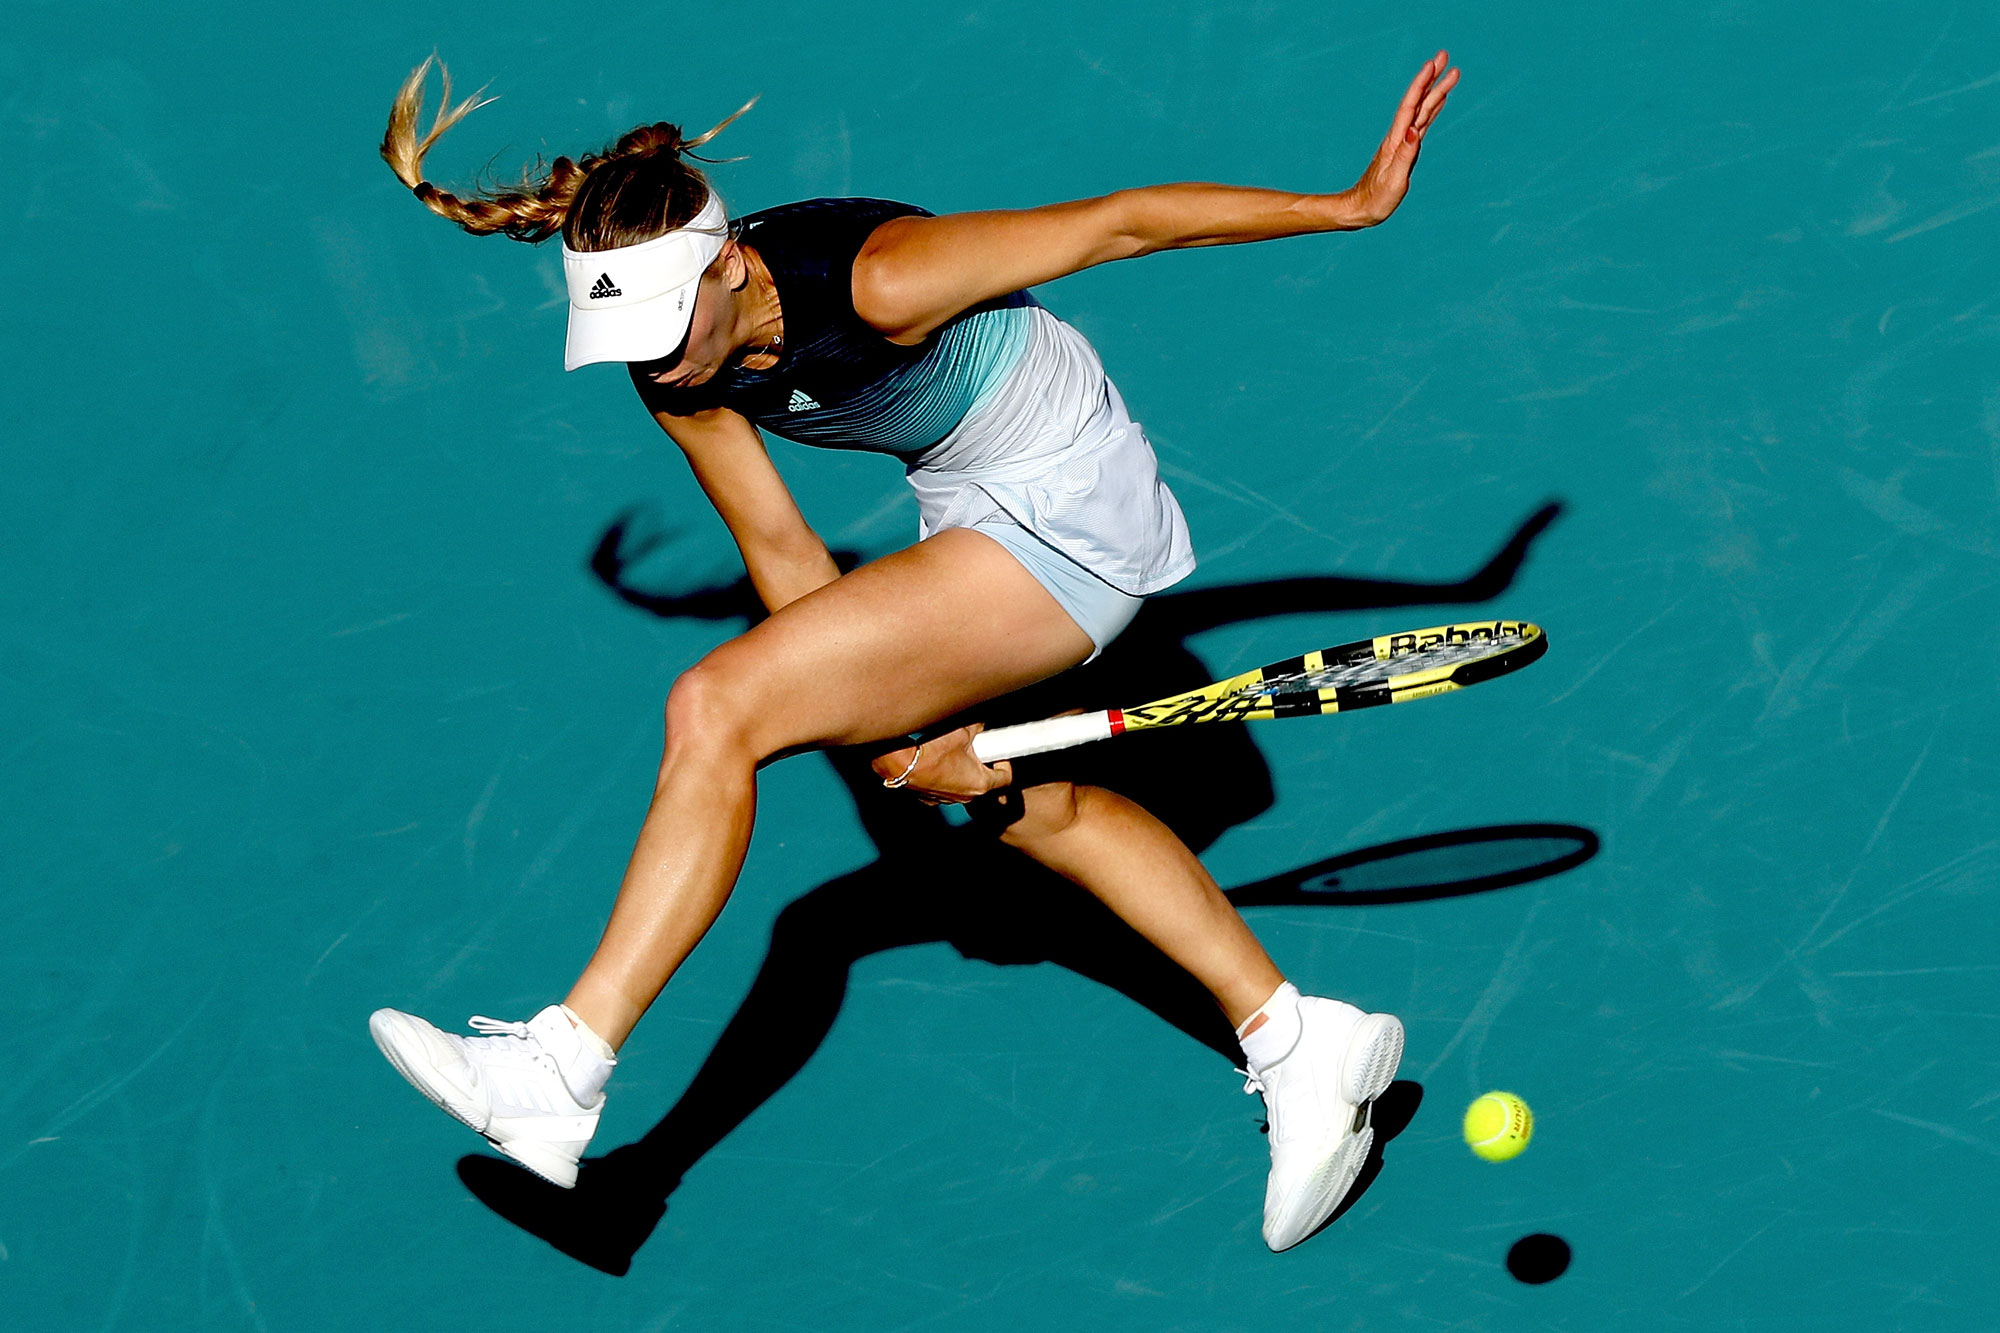
Matthew Stockman (Getty Images) | Canon EOS-1D X Mark II | EF 300mm f/2.8L IS II USM | 300mm | f/8.0 | 1/2500 | ISO 320
Top Tips for Tennis Photography
The momentum of a tennis match can shift in seconds, so photographing the sport takes focus and preparation. When you understand the players, choose your position carefully and pay attention to the light, you give yourself a far better chance of capturing the moments that shape the match.
Research Players and Teams
Researching players before a match is the best way to anticipate their movements and reactions. Before you start shooting, take some time watching the players and take notes. Find out whether they are left- or right-handed, whether they tend to rush the net or stay well back, where they look after winning or losing a point and take notes on how they tend to celebrate and react.
“Each player has distinct habits… Do they come to the net? Are they left or right-handed? Do they show personality?”
You can also get valuable insight from coaches, team social media and match footage from bigger matches to learn what angles best highlight a player’s form or personality. The more you understand who you’re photographing, the easier it becomes to predict key moments and create images that tell a story.
Start with one player and watch them for a few games. You’ll quickly identify their habits, which will help you know when to get ready. If you can, use a standard zoom (18-55mm, 24-70mm) for warm-up portraits and reactions, and a telephoto zoom (55-200mm or 70-200mm) for the action.
Matthew Stockman (Getty Images) | Canon EOS-1D X | EF 15mm f/2.8 Fisheye | 15mm | f/4.0 | 1/320 | ISO 800
Work With Your Court Position
One of the biggest mistakes photographers can make when they’re just starting out is trying to chase the action by constantly moving around the court. The pros don’t do that, and there’s a reason for that. Tennis has a rhythm, and you can only learn to anticipate it when you stay put long enough to see the patterns. Pick a spot and commit to it for a set or even several games. This will help you build confidence where you are. Through repetition, your timing will sharpen, your compositions will get cleaner, and you’ll start recognising those key moments in play.
“I tend to commit to a spot for an entire set. Constant movement usually leads to a collection of average images rather than something exceptional.”
Court position is everything in tennis photography, and different spots offer different storytelling opportunities. Settling into a single position isn’t limiting, but it can be where your best, most consistent images will come from. Some easy positions are: behind the baseline (for the best ball-on-racquet shots), the sidelines (ideal for dynamic, close-up action), and in the stands (for wide atmospheric shots).
Follow Court Etiquette
Keeping good etiquette helps you blend in, stay on court and most importantly, be invited back. If you’re shooting at an organised match, especially at tournaments, etiquette is just as important as composition. You need to remember to move only during changeovers or between games (never at the mid-point). Never block an umpire, judges or spectators. Respect the no-flash and no-shutter noise rules. Do not rest your gear or equipment on sponsorship boards or the net posts.
At professional events, photographers are placed in designated locations. They are most commonly in the pits on the sidelines, behind the baseline or overhead positions on large courts.
A 70-200mm lens (or 55-200mm on APS-C cameras) is the perfect tool to capture different angles. The versatility will help you stay in one place while still getting tight action shots and expressive player moments without needing to move around too much or disrupt play.
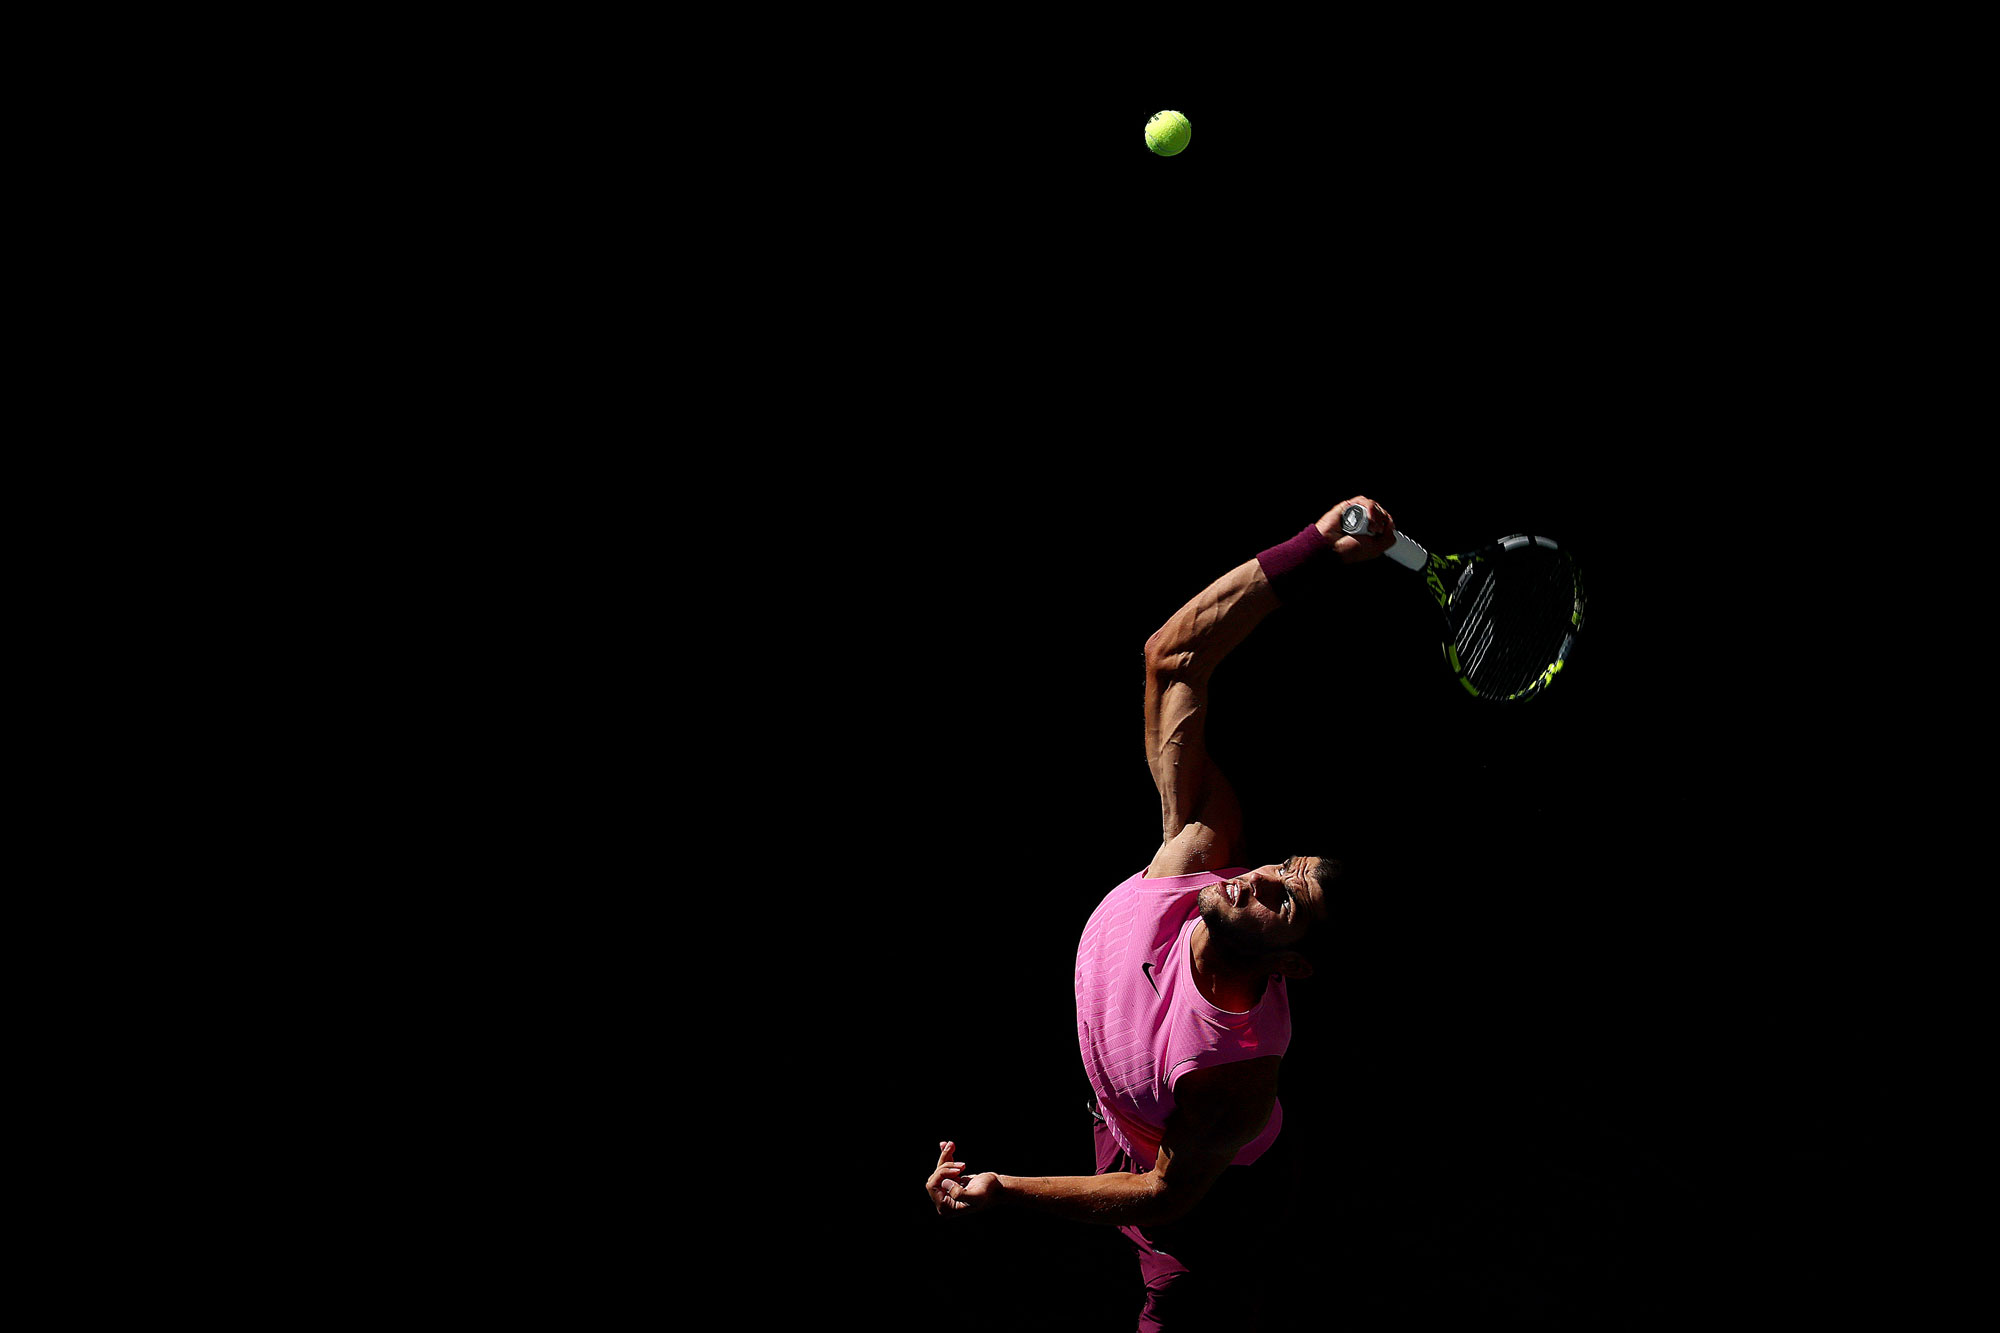
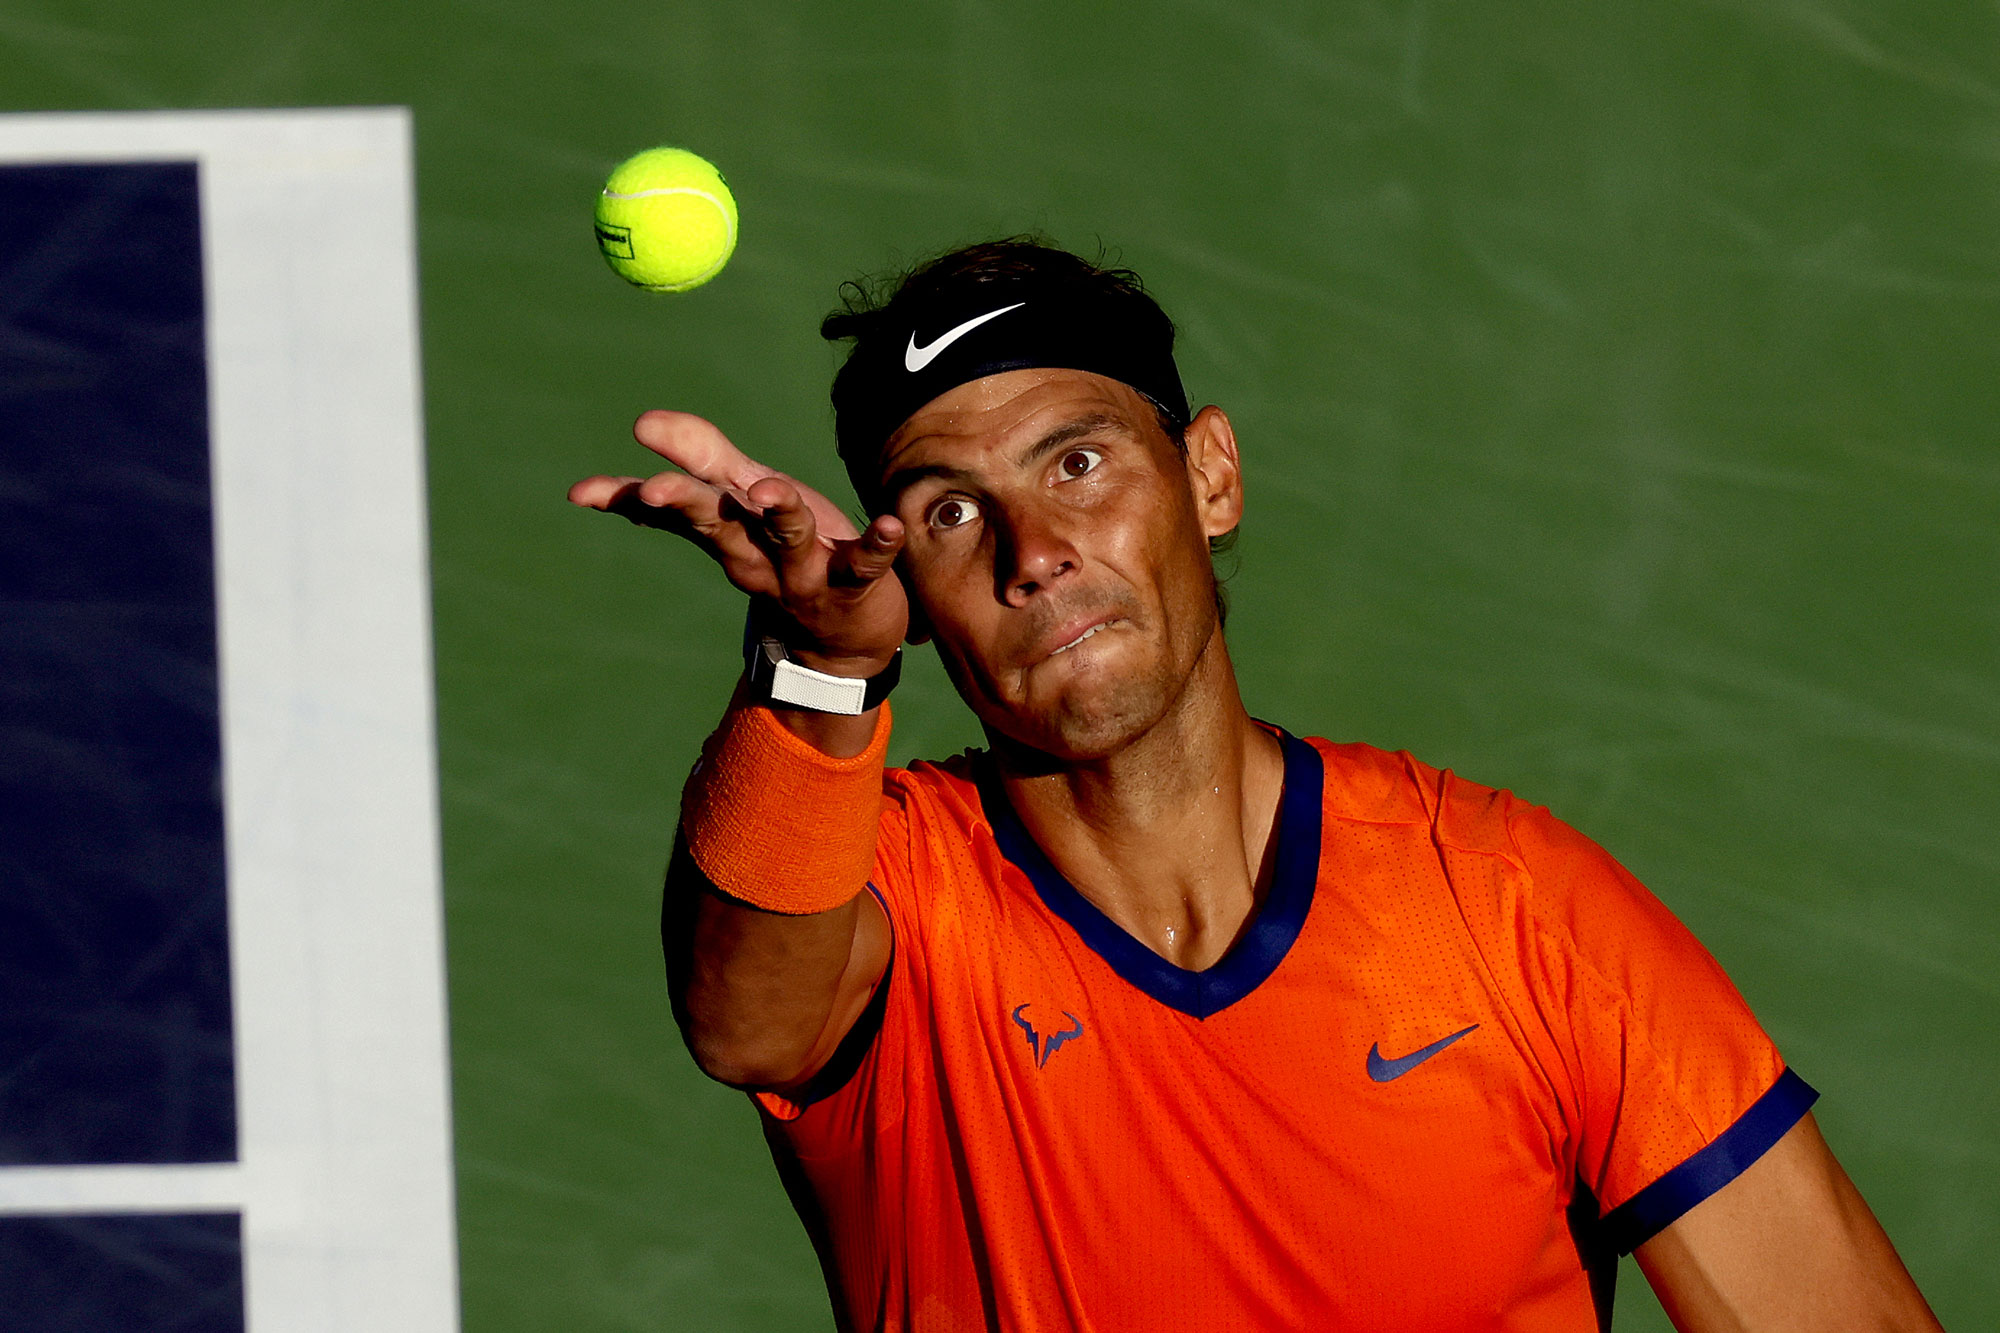
Matthew Stockman (Getty Images) | Canon EOS R1 | RF 400mm f2.8 L IS USM | 560mm | f/7.1 | 1/3200 | ISO 320
Work With the Light
Light is one of the biggest challenges in tennis photography, but once you understand it, it can become one of your most handy secrets. Tennis matches can last under an hour or stretch beyond five, so the light will change constantly, especially outdoors.
“Before a tournament begins, I walk the courts to check out the light. Each court has a window when the light is at its best and long stretches when it isn’t."
Matthew Stockman (Getty Images) | Canon EOS R1 | RF 400mm f2.8 L IS USM | 560mm | f/7.1 | 1/2500 | ISO 320
“Late afternoon, when the light and shadows cross the court, (to me) is the best moment of the day.”
If the light looks beautiful in one direction, wait for the action to come into that patch of good light. Tennis is repetitive, so players will naturally return to those areas again and again throughout the match.
Matthew Stockman (Getty Images) | Canon EOS R1 | RF 100-300mm f2.8 L IS USM | 216mm | f/2.8 | 1/2500 | ISO 4000
Beginner Lighting Cheatsheet
Different times of day can mean different things for your shoots.
Morning: Means soft, flattering light, which is great for portraits.
Midday: Can involve harsh sunlight, so shoot with the sun behind the player.
Late afternoon: This is the best time for beginners, with warm colours and long shadows.
Evening: This means floodlights, which may be bright but may require a higher ISO.
Different surfaces also respond differently to light:
Clay: Brings warm colours and dust clouds that can sparkle in low-angle light.
Grass: Means lower bounce and lower angles for long shadows and clean, simple backgrounds.
Hard court: Think strong reflections and saturated colours. Angle yourself to avoid distracting glare.
You don’t need fancy kit, just make sure you choose the angle that makes the light work for you, not against you. Remember a lens hood to reduce glare and look out for silhouettes, cross-court shadows and high-contrast scenes.
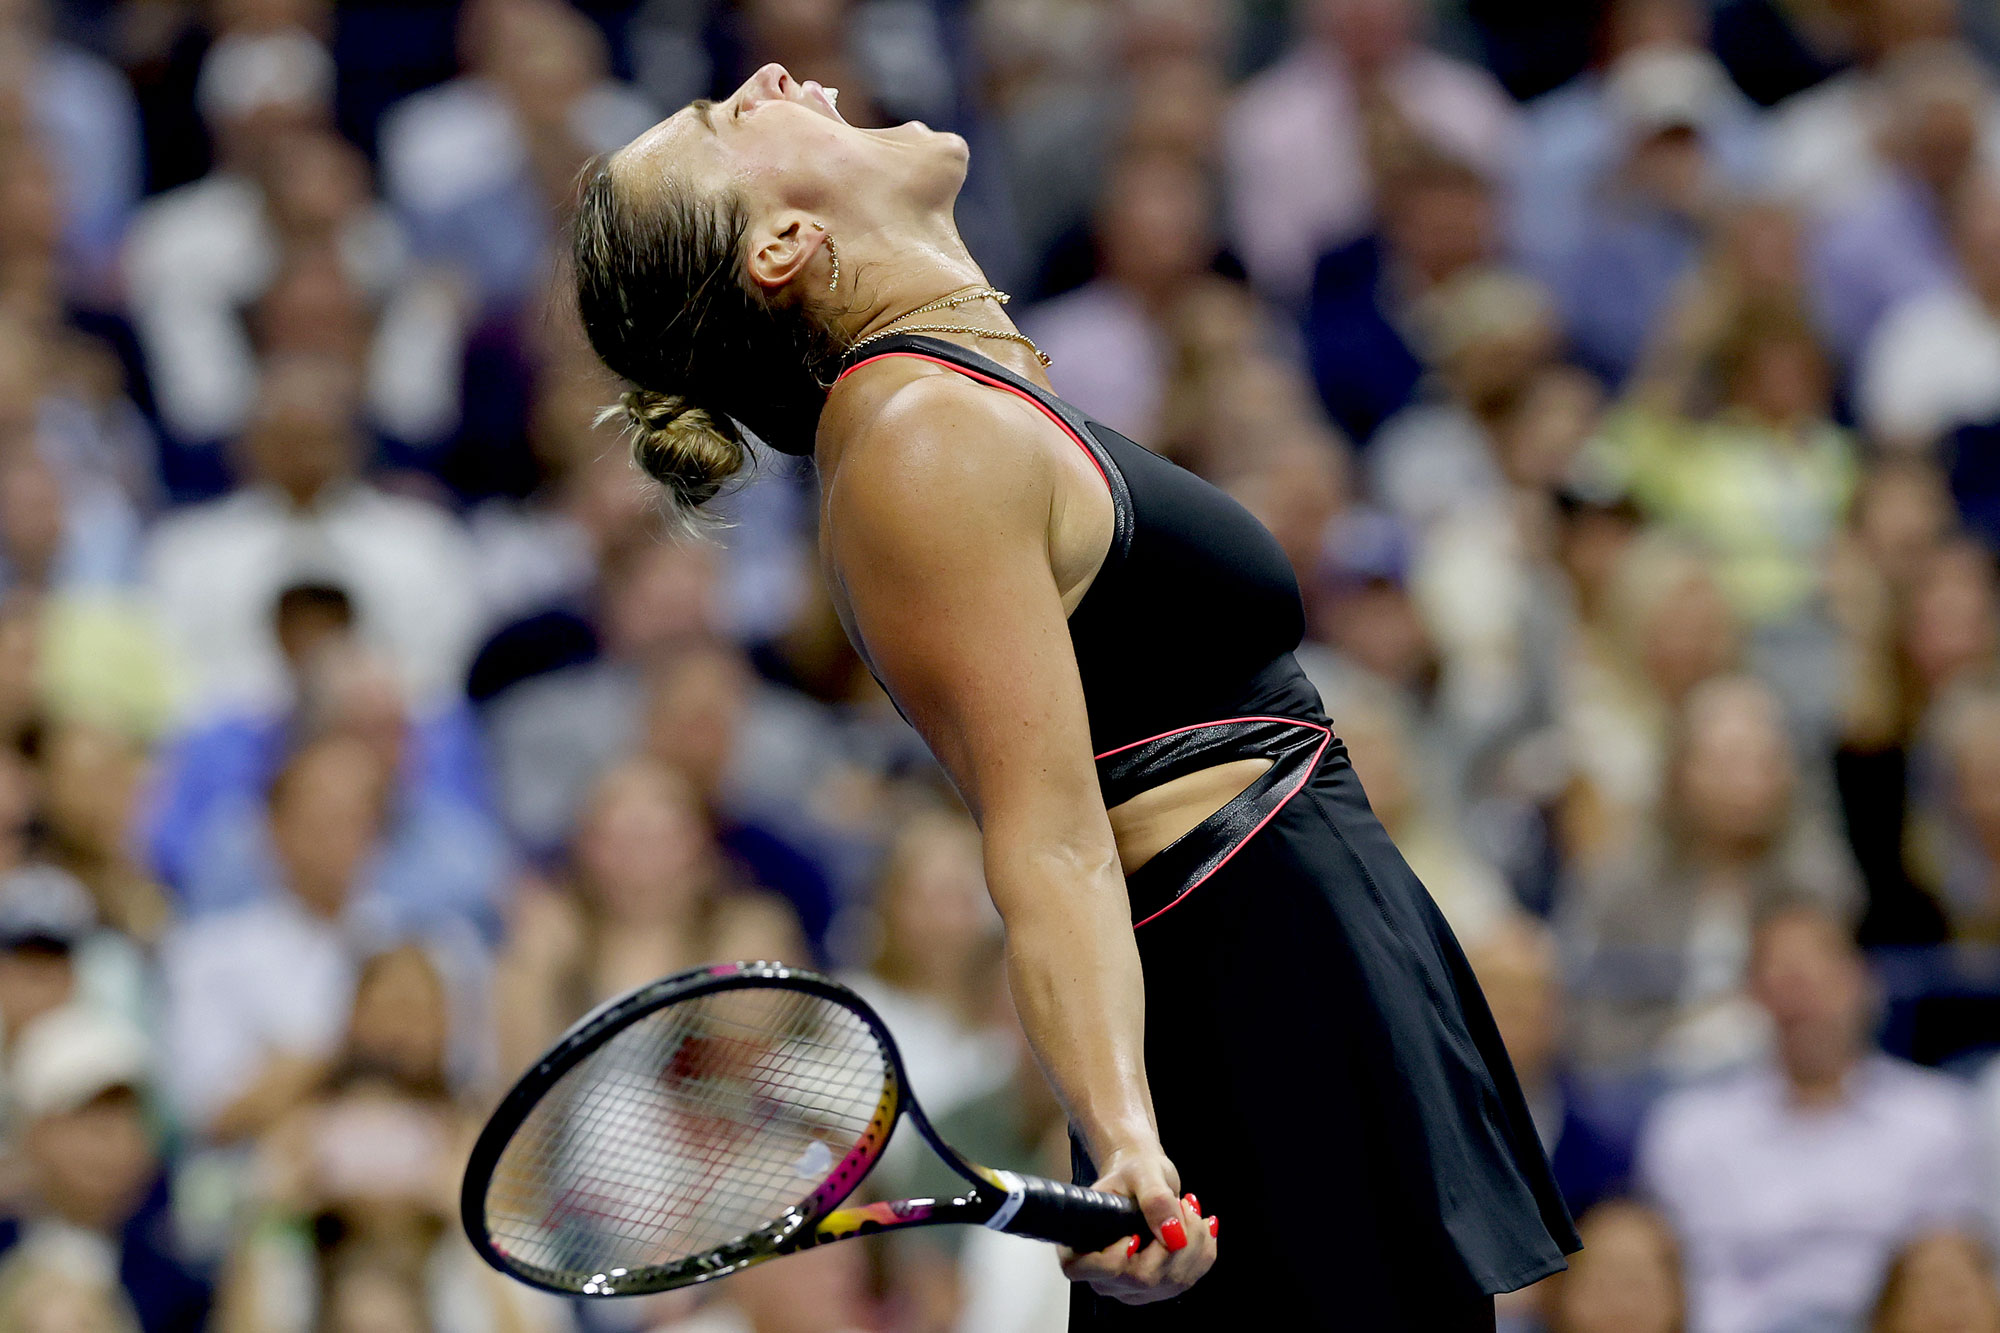
Capture the Action and Emotion
Tennis can be predictable, which makes it perfect for a sports photographer. Because the action repeats, you get more chances to practise your timings. Miss an impact shot on the forehand? No problem. Another one is coming in 20 seconds. Start off by capturing some easy action moments as you get settled into the match, such as the ball just touching the strings, a reaction right after a point, or a player stretching for a return.
“Tennis is repetitive, and that’s a strength if you use it well. Make mental notes on each player, work on your timing, and stay for the entire match.”
You don’t need to follow the ball perfectly. Instead, track the player and learn to anticipate the moment of impact or extension. Tennis movement has repeating beats: the toss, the hit, the recovery step and the reaction.
Remember, quiet frames can be just as powerful. For beginners, these quiet moments are perfect because they don’t require split-second timing. Try techniques like: framing players in the court with the crowd; players breaking routines (water break, ice towels, coaching advice); and still shoes or balls on the court with no players in them.
Use burst mode (your camera takes multiple frames quickly), or eye or face tracking if your camera has it. A telephoto zoom is also useful so you can stay safely outside the court fence.
Matthew Stockman (Getty Images) | Canon EOS R3 | EF 300mm f/2.8L IS II USM | 300mm | f/2.8 | 1/2500 | ISO 2500
Camera Settings
Your camera settings don’t need to be complicated. Even at the highest professional level, the basic techniques matter most: keep your ISO as low as the light allows and use a wide aperture courtside to isolate the player. You also want to adjust your settings when shooting from higher positions or under different lighting conditions.
“Courtside, I start with a low ISO and shoot wide open… Overhead, I shoot with the light and stop down to saturate colour.”
The core principle is simple: let the light guide your choices. Because tennis moves quickly, you need a camera with a shutter speed that’s fast enough, while your aperture should stay open enough to let in plenty of light. Your ISO can then handle the rest.
Here are some reliable settings:
Shutter speed: 1/1000s
Aperture: f/2.8 to f/4
ISO: Auto ISO with a maximum of 3200 to 6400
This combination is fast enough to freeze action, wide enough to keep your subject clear, and adaptive enough to handle changing light throughout a match.
Matthew Stockman (Getty Images)
Be Patient
For beginners, patience is one of the most valuable skills you can develop. Tennis is a sport of rhythm and repetition, and the best photographs often come from simply staying present, watching how the match unfolds and waiting for the right moment. Tennis rewards you if you stay present, read the play and commit to long sessions.
“Be ready, and be patient.”
Patience means observing, learning and being ready. The player will move. The light will change. The match will reveal its story. Your job is to notice it and be prepared for when the moment arrives.
Bring spare batteries and high-capacity memory cards. Nothing will kill your patience faster than running out of power or storage mid-match. Two batteries and two cards should do the trick.
Matthew Stockman (Getty Images)
How to Become a Professional Tennis Photographer
Now that you know how to shoot the action and start producing tennis images that serve a story, the next step is turning that foundation into a professional career. How exactly do you move from shooting as a beginner to earning credentials at professional matches?
Start Small
Just like our broader sports photography guide, you don’t need Wimbledon credentials to begin. Start small, shooting at local clubs, school or University matches or smaller regional tournaments. Small clubs and community courts allow for a relaxed environment where you can move freely, experiment with positions and practise your timing without the pressure of a stadium setting.
“Start small. Cover events where access isn’t an obstacle… You need to build your portfolio, which will lend credibility for future work and access.”
It’s worth remembering that some may also restrict where images can be shared. Even with photographing adults, a quick, friendly conversation can go a long way when you’re working close to the court or planning to use images for a portfolio. It is also good to be mindful during sensitive moments. Avoid photographing players receiving medical treatment, dealing with injuries or experiencing distress unless you have clear permission and a respectful purpose for doing so. Building trust with the people you photograph protects them and strengthens your reputation, helping you become the kind of photographer that players and organisers are happy to have you shoot the match.
A simple, affordable 55-200mm (APS-C) or 70-200mm f/2.8 (full-frame) lens gives you enough reach to capture rallies, reactions and portraits without being courtside. Lightweight gear makes long sessions easier and reduces fatigue when you’re learning.
Matthew Stockman (Getty Images) | Canon EOS-1D X | EF 300mm f/2.8L IS II USM | 300mm | f/2.8 | 1/1600 | ISO 400
Build a Portfolio
You don’t need thousands of photos in your portfolio, just a collection of thoughtful images that show you understand the sport. Editors and organisers look for consistency and awareness, not just big action moments. You want to include a mix of images from tight action shots to emotional moments and crowd scenes. Also, consider adding some tennis portraits if the players agree. As you shoot more, your eye sharpens, your timing improves, and your portfolio will naturally become stronger.
“Build your portfolio image by image; it will evolve as you do.”
If you want portraits that stand out, consider adding an affordable prime lens, such as a 35mm f/1.8 or 50mm f/1.8. These lenses are inexpensive, sharp and perfect for capturing the quieter, emotional moments that will make a portfolio distinctive.
Matthew Stockman (Getty Images) | Canon EOS-1D X Mark II | EF 300mm f/2.8L IS II USM | 300mm | f/4.0 | 1/1000 | ISO 3200
Network and Assist
Don’t be afraid to put yourself out there. Many tournaments (even regional and junior events) have an official photographer or a small media team.
“Shadowing them for a day can be a valuable experience.”
Assisting them, even once, exposes you to workflow, pressure and deadlines. While budgets are often limited, the educational value will be huge. You can also look at engaging with organisers on social media, as they often need volunteers. Anything you can do to build trust and recognition will aid your sports photography journey. Remember: At higher levels, shooting is only half the job; the other half is editing, captioning and delivering your images quickly.
At major tournaments, photographers often deliver their images during the match, sometimes within minutes of a key point, which means choosing and deleting images quickly, and good organisational skills are pretty much vital. Pros rely on tools like Photo Mechanic for lightning-quick image selection and metadata entry, then make simple, consistent edits in software like Lightroom before exporting. Every image needs to be captioned in detail, including: player(s) names, round, location, date and any notable moments, so your images are searchable and usable by editors. Establishing these habits early makes your work more professional and easier to find. The more streamlined your workflow, the easier it will be to meet deadlines when you get an opportunity.
If you’re assisting or shadowing a pro, bring two cameras if possible. One body with a telephoto zoom for action and one with a wider lens for portraits. It helps you keep up with fast-changing situations and learn how the professional process works.
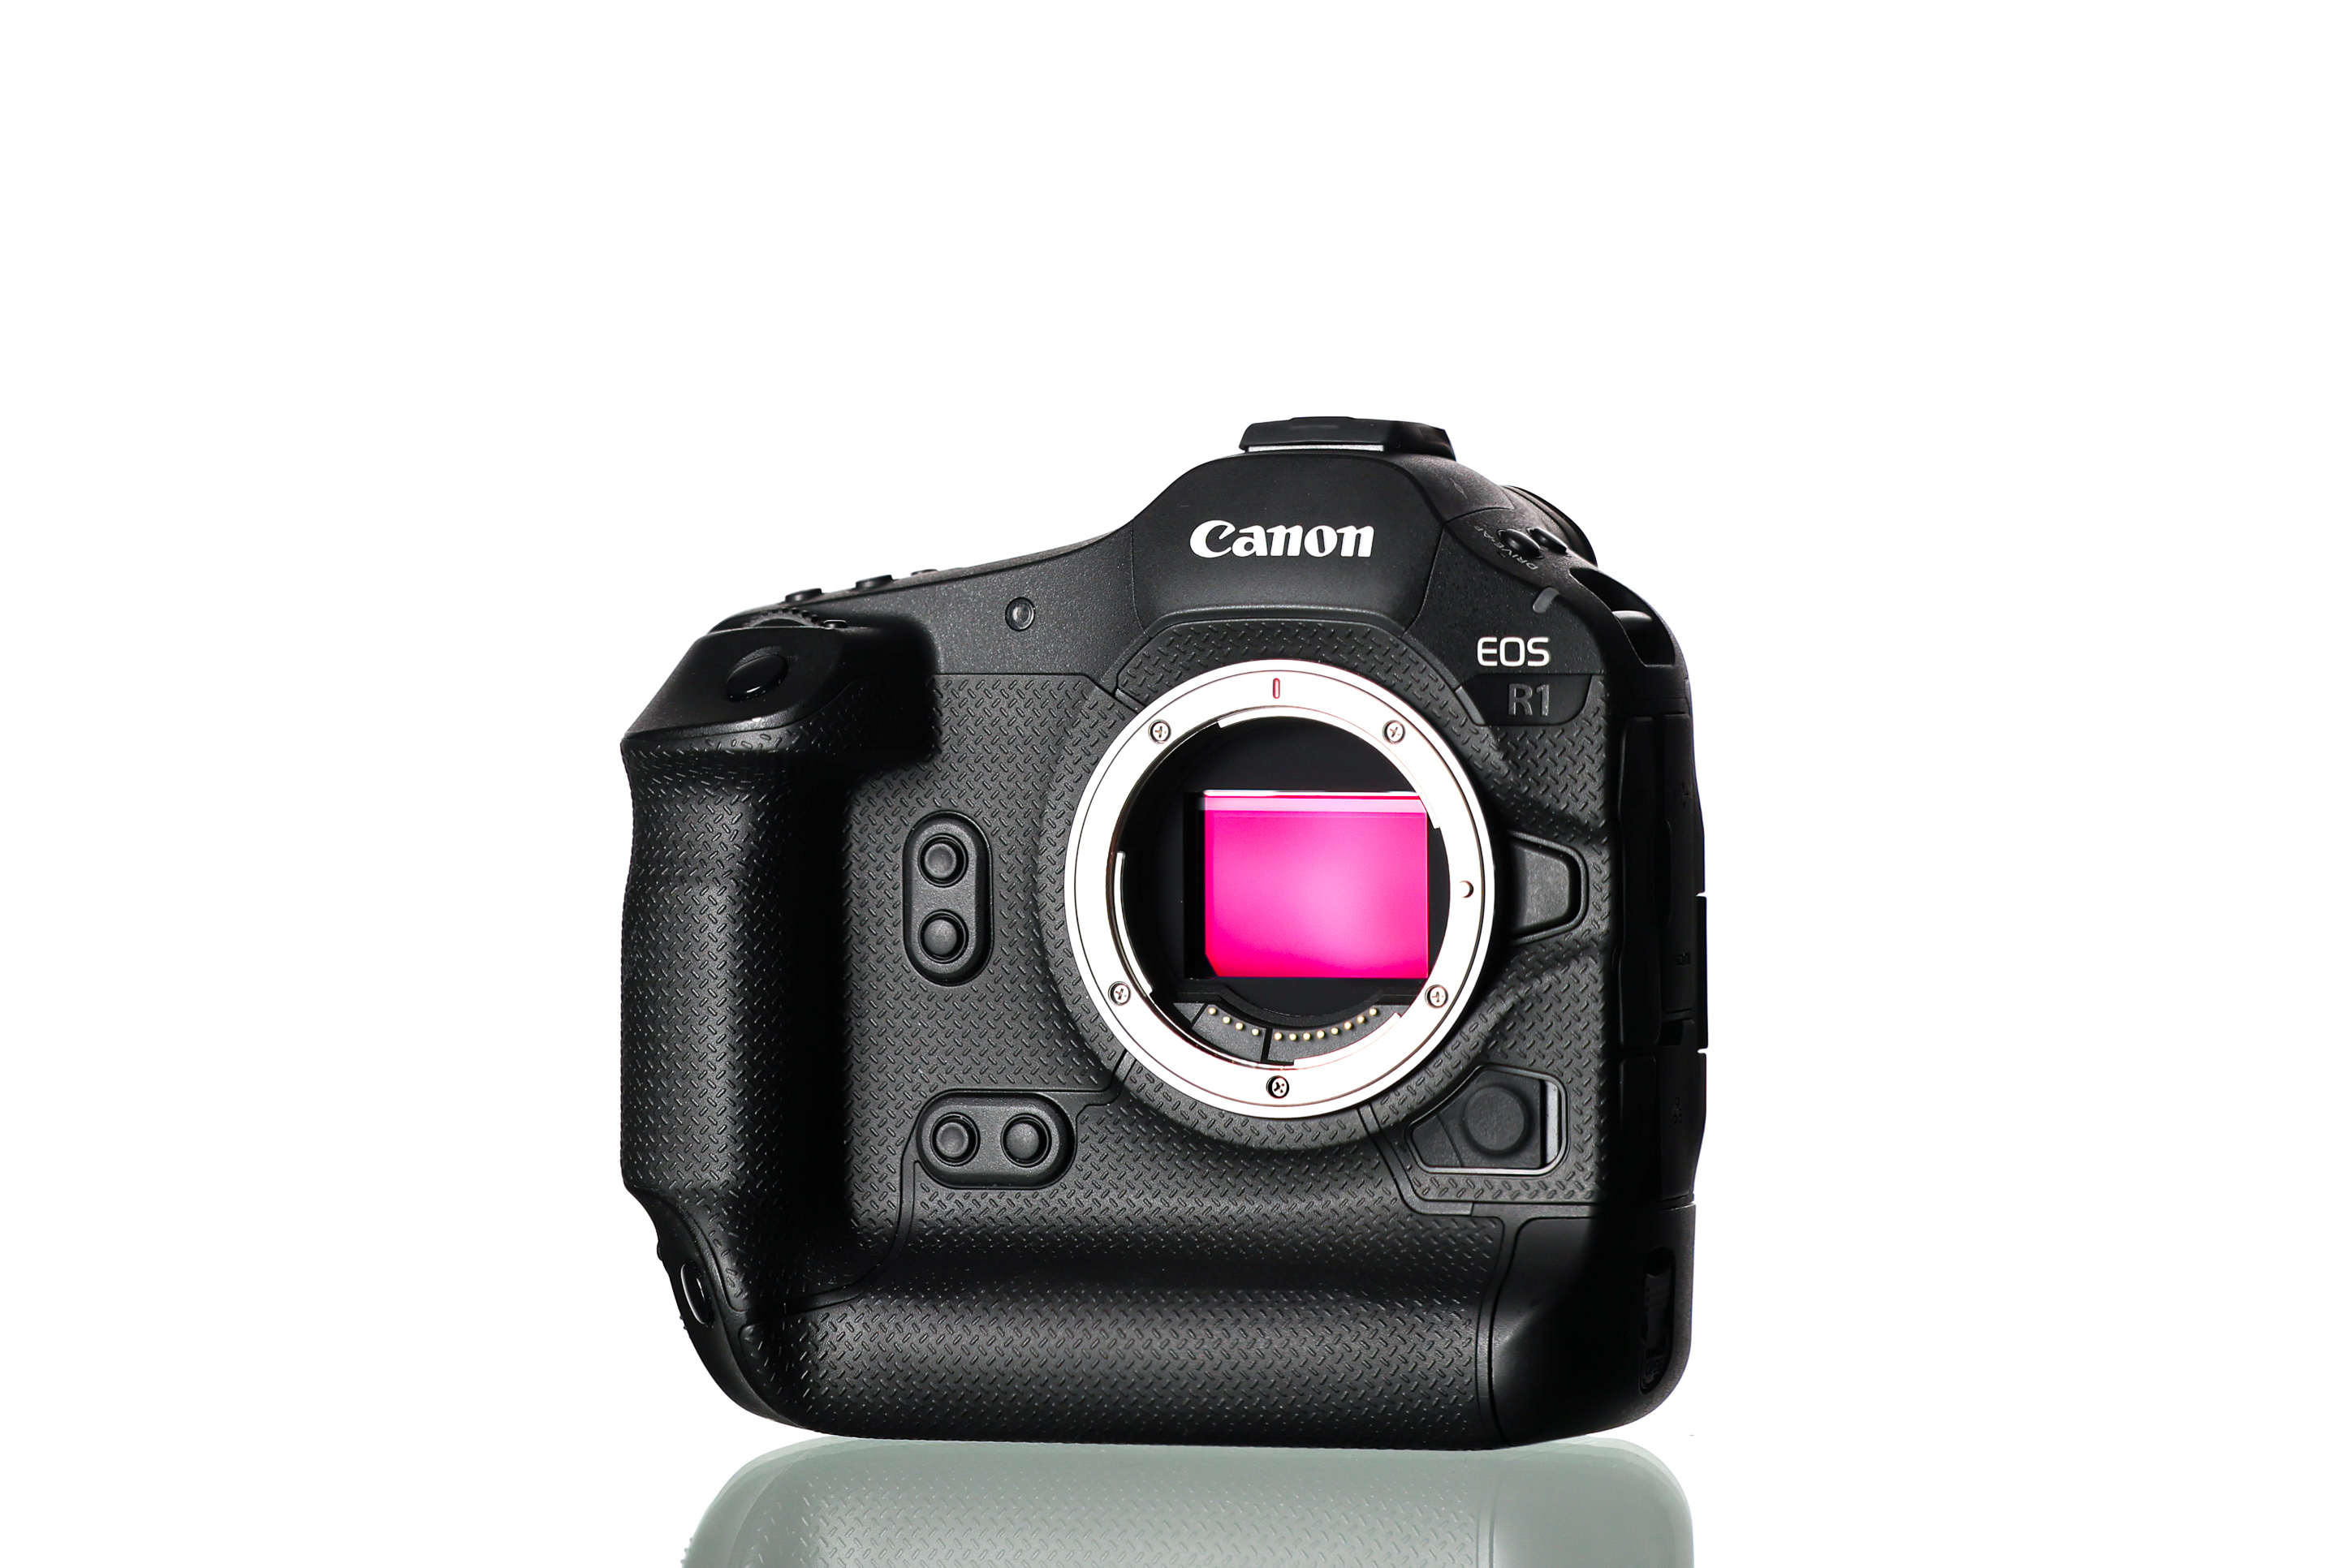
Used Canon EOS R1
Best Camera Gear for Tennis Photography
Matthew travels with a full pro setup but keeps things light on court. His go-to body is the Canon EOS R1 paired with fast, reliable lenses like the RF 100-300mm f/2.8 L IS and RF 400mm f/2.8 L IS on a monopod. It’s a setup ideal for long days, fast play, and changing light. A camera with a silent shutter is great, because at professional matches you’ll need to be silent so as not to distract the players.
“I try to keep the gear minimal, but always have options."
Beginners don’t need flagship gear to get started. A mid-range mirrorless body like the Canon EOS R6 or Canon EOS R7, Sony A7 IV or Nikon Z6 II paired with a 70-200 mm or 100-400 mm lens offers plenty of reach and more than enough speed for learning the rhythm of the game.
Best Accessories for Tennis Photography
Accessories come in very handy when you’re trying to stay agile and consistent during long, fast-moving matches. A sturdy yet lightweight monopod will give you the stability you need to track quick rallies with longer lenses, while a lens hood helps control harsh sunlight and unpredictable reflections across the court. You’ll need extra batteries and large memory cards, and ideally a compact shoulder bag to move quietly and efficiently between positions.
“The little things in your bag often make the biggest difference.”
Consider building a small accessory bag, so you’re ready for anything on the court. Include a lightweight monopod, a polarising filter to cut glare, a weather cover for sudden rain or dust and a cleaning gear with microfibre cloths or a blower for fast touch-ups. You could also consider a foldable kneepad, a quick-release strap, and a spare memory card case or power bank to help ensure your shoot goes as smoothly as possible. Obviously, this will all depend on your budget.
Matthew Stockman (Getty Images) | Canon EOS-1D X | EF 70-200mm f/2.8L IS II USM | 123mm | f/3.5 | 1/2000 | ISO 400
FAQs
What is tennis photography?
Tennis photography is the practice of capturing fast action and moments of emotional storytelling during tennis matches.
Do I need pro-level access to start?
You don't need pro-level access to start tennis photography. Clubs and community matches are perfect for beginners.
What basic camera settings should I use?
As a starting point, the best camera settings for tennis photography are around 1/1000s, f/2.8 to f/4, and Auto ISO capped at 3200 to 6400.
What lenses work best?
A 70-200mm, 70-300mm or 100-400mm lens gives you ideal reach for most tennis courts.
Where should I position myself?
Pick one spot: baseline, sidelines, or stands, and stay there to learn the rhythm.
How do I handle changing light?
Let the light guide your angle. It’s soft in the morning, harsh at midday and often best in late afternoon.
How do I capture action and emotion?
Use burst mode, track focus and watch for both big plays and quieter storytelling moments.
What skills matter most?
Patience, timing and understanding player habits are essential for tennis photography.
How do I build a portfolio?
Choose a small set of consistent action, emotion and atmosphere shots to make your portfolio stand out.
How do I get experience?
Gaining experience in the field requires action. Start small, assist local photographers and connect with tournament organisers.
Do I need two cameras?
You won't need two cameras at first, but two bodies can help you switch quickly between action and wider scenes.
Is a silent shutter important?
A silent shutter is important, especially at pro events where noise can distract players.
What accessories should I bring?
Extra batteries, large memory cards, a monopod and a lens hood are must-have accessories in your camera bag.
Matthew Stockman (Getty Images) | Canon EOS R3 | EF 500mm f/4L IS II USM+2x | 1000mm | f/8.0 | 1/6400 | ISO 800
Start Your Tennis Photography Journey
Tennis photography rewards patience, timing and a feel for the game. Once you’ve got the fundamentals down, it becomes about anticipating the moment and being ready when it all comes together. When it’s time to upgrade your gear, MPB makes it easy to find quality used cameras and lenses that have been expertly checked and ready for point, set, match.
Ready to keep building your sports photography skills? You can also learn directly from the pros through interviews with photographers Morgan Treacy and David Gray, plus get practical advice on choosing the best camera setups for sports photography.
Read more tips and techniques on the MPB content hub.
You can sell or trade your camera kit to MPB. Get a free instant quote, free insured shipping to MPB, and get paid within days.