How To: Create a Wildlife Camera Trap
Published June 19, 2026 by MPB
Vishal Subramanyan is a UC Berkeley student and an active wildlife conservation photographer who has made capturing critters his passion. Read on for his wildlife trap advice so you can create your own camera trap for wildlife to photograph your favorite animals in their natural habitat.
Over to you, Vishal.

Vishal Subramanyan | Nikon D7200 | Nikon AF Nikkor 24-85mm f/2.8-4D IF | f/10 | 1/125 | 24mm | ISO 800
It’s hard to stand out in the world of wildlife photography today. With an abundance of high-quality telephoto lenses, increasing access to remote wildlife locations and improved post-processing software, producing high quality wildlife images has never been easier.
For a long time, I pursued wildlife photography in the very traditional sense. Equipped with a telephoto 500mm f/5.6E PF ED VR prime lens and the full frame Nikon D850, I mostly captured close-up images of wildlife with blurred out backgrounds. In 2022, after nearly seven years of photographing wildlife like this, I was frustrated with my lack of unique images and I was ready to try something new. That’s when I found out about camera trapping.
Vishal Subramanyan | Nikon D850 | Nikon AF-S Nikkor 500mm f/5.6E PF ED VR | f/5.6 | 1/160 | 500mm | ISO 2000
What is a Camera Trap?
Camera traps are motion-activated cameras that take pictures or videos when an animal walks in front of the sensor. Most camera traps on the market are known as trail cameras, and they use low quality, low resolution sensors to monitor wildlife. They don’t provide the high quality images most photographers are looking for. However, you can take your old DSLR camera, along with a wide angle lens, and turn that into a camera trap, too. This type of camera trap, known as a DSLR camera trap, allows you to obtain high resolution images of wildlife. I started camera trapping with my old Nikon D7200 and 24-85mm lens that I borrowed from a friend.

Vishal Subramanyan | Nikon D7200 | Nikon AF Nikkor 24-85mm f/2.8-4D IF | f/10 | 1/125 | 24mm | ISO 800
This method was intriguing to me for many reasons. As I mentioned, I wanted my images to stand out in an age where wildlife images on the internet are abundant. And camera trapping was the way to do that. This method also appealed to me because it proved to be more time efficient and allowed me to be far less intrusive to the animal when photographing wildlife.
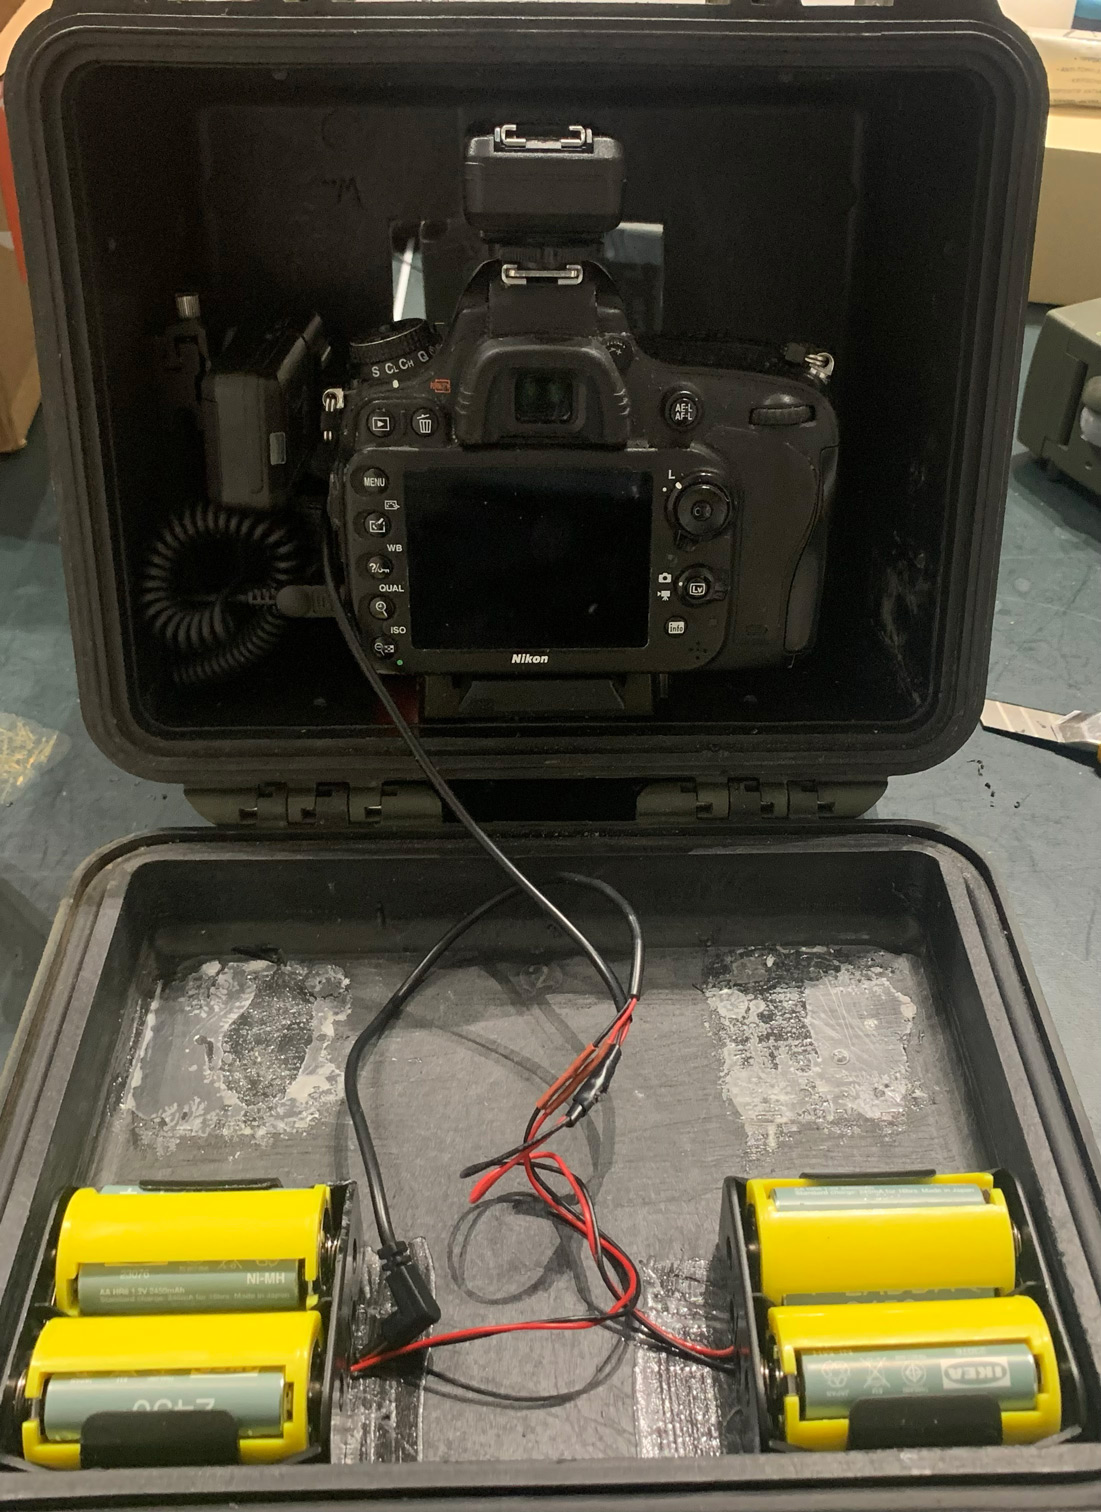
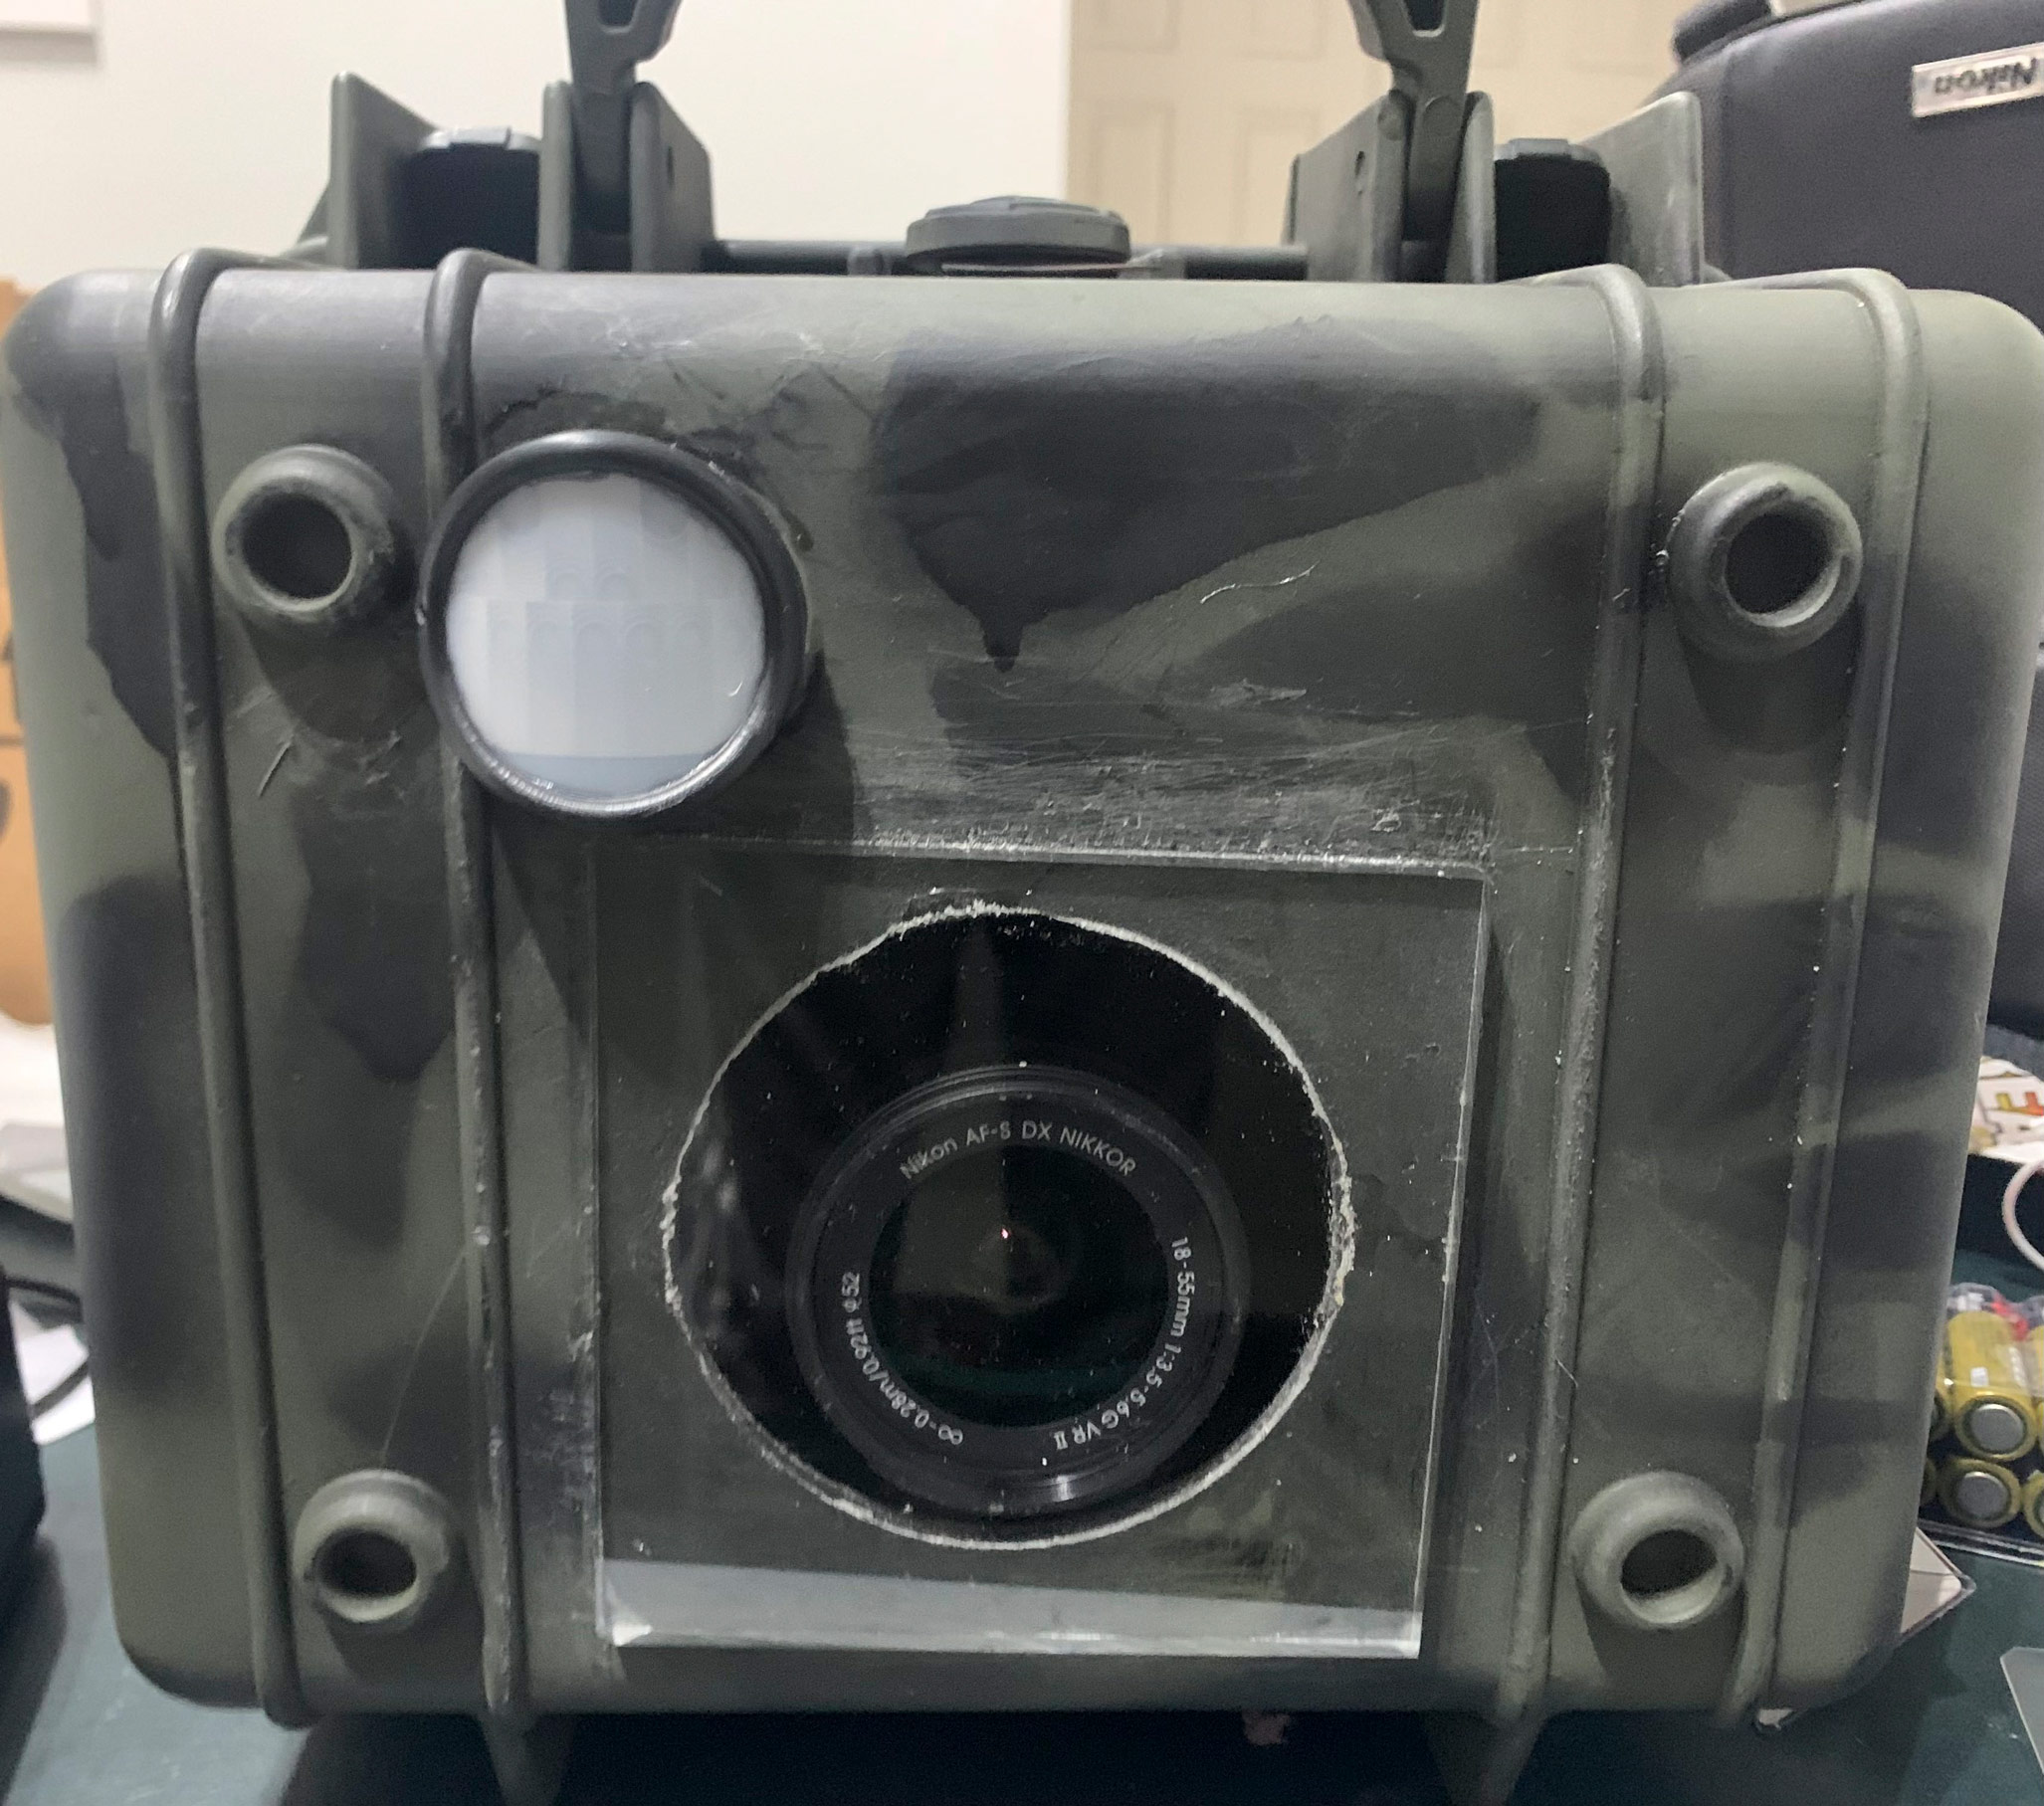
Inside of a homemade DSLR Camera Trap
Why Use Camera Traps for Wildlife?
One key way camera traps produce unique images is by allowing you to capture elusive animals you wouldn’t see in person. In my case, they allowed me to capture images of mountain lions, which are almost impossible to photograph in person. Not only do camera traps allow you to capture these rare subjects, they also allow you to capture them from unique perspectives. Camera trapping is done up close with wide angle lenses that capture the surroundings in great detail. This creates a more natural look to the image, and allows you to tell a better story of the animal and the environment it lives in.
Vishal Subramanyan | Nikon D600 | Nikon AF Nikkor 20-35mm f/2.8D | f/10 | 1/160 | 30mm | ISO 560
Another reason I was drawn to camera trapping is that it is a more time efficient form of photography. Running DSLR camera traps is a great way to build up a large collection of photographs without investing hours of time in the field every week. Don’t get me wrong, I love being in the field, but when timing doesn’t allow it, camera trapping is a great way to get photographs of wild animals.
But most importantly, camera trapping is a less-invasive way to capture images of wildlife. Wildlife photographers often use unethical methods like baiting, intentional flushing and getting much too close to animals. When I’m photographing wildlife in person, I try my best to make sure I’m minimizing my impact, but the best way to minimize impact is to not be present at all. When no humans are present, the animals are far more likely to behave naturally when moving through the landscape. As a conservation photographer, my goal is to illustrate wildlife in their natural state while causing minimal disturbance. Using a camera trap for wildlife makes this possible.
Vishal Subramanyan | Nikon D600 | Nikon AF Nikkor 24-85mm f/2.8-4D IF | f/10 | 1/160 | 30mm | ISO 560
DSLR Camera Trap Gear
A DSLR camera trap involves four main parts: the sensor, the camera gear, the housing and the flashes. I’ll cover all of these main components and the options that are available on the market.
Sensor
The sensor is the primary component of a camera trap. The two main types of sensors on the market are passive infrared (PIR) and active infrared (AIR) sensors. The most commonly used sensor, the PIR, operates by detecting infrared light emitted from objects in its field of view. Active infrared sensors, often called beam breaks, involve two main components — a transmitter and a receiver. When aligned correctly, an invisible infrared beam is created, and the camera gets triggered every time an animal breaks the beam.
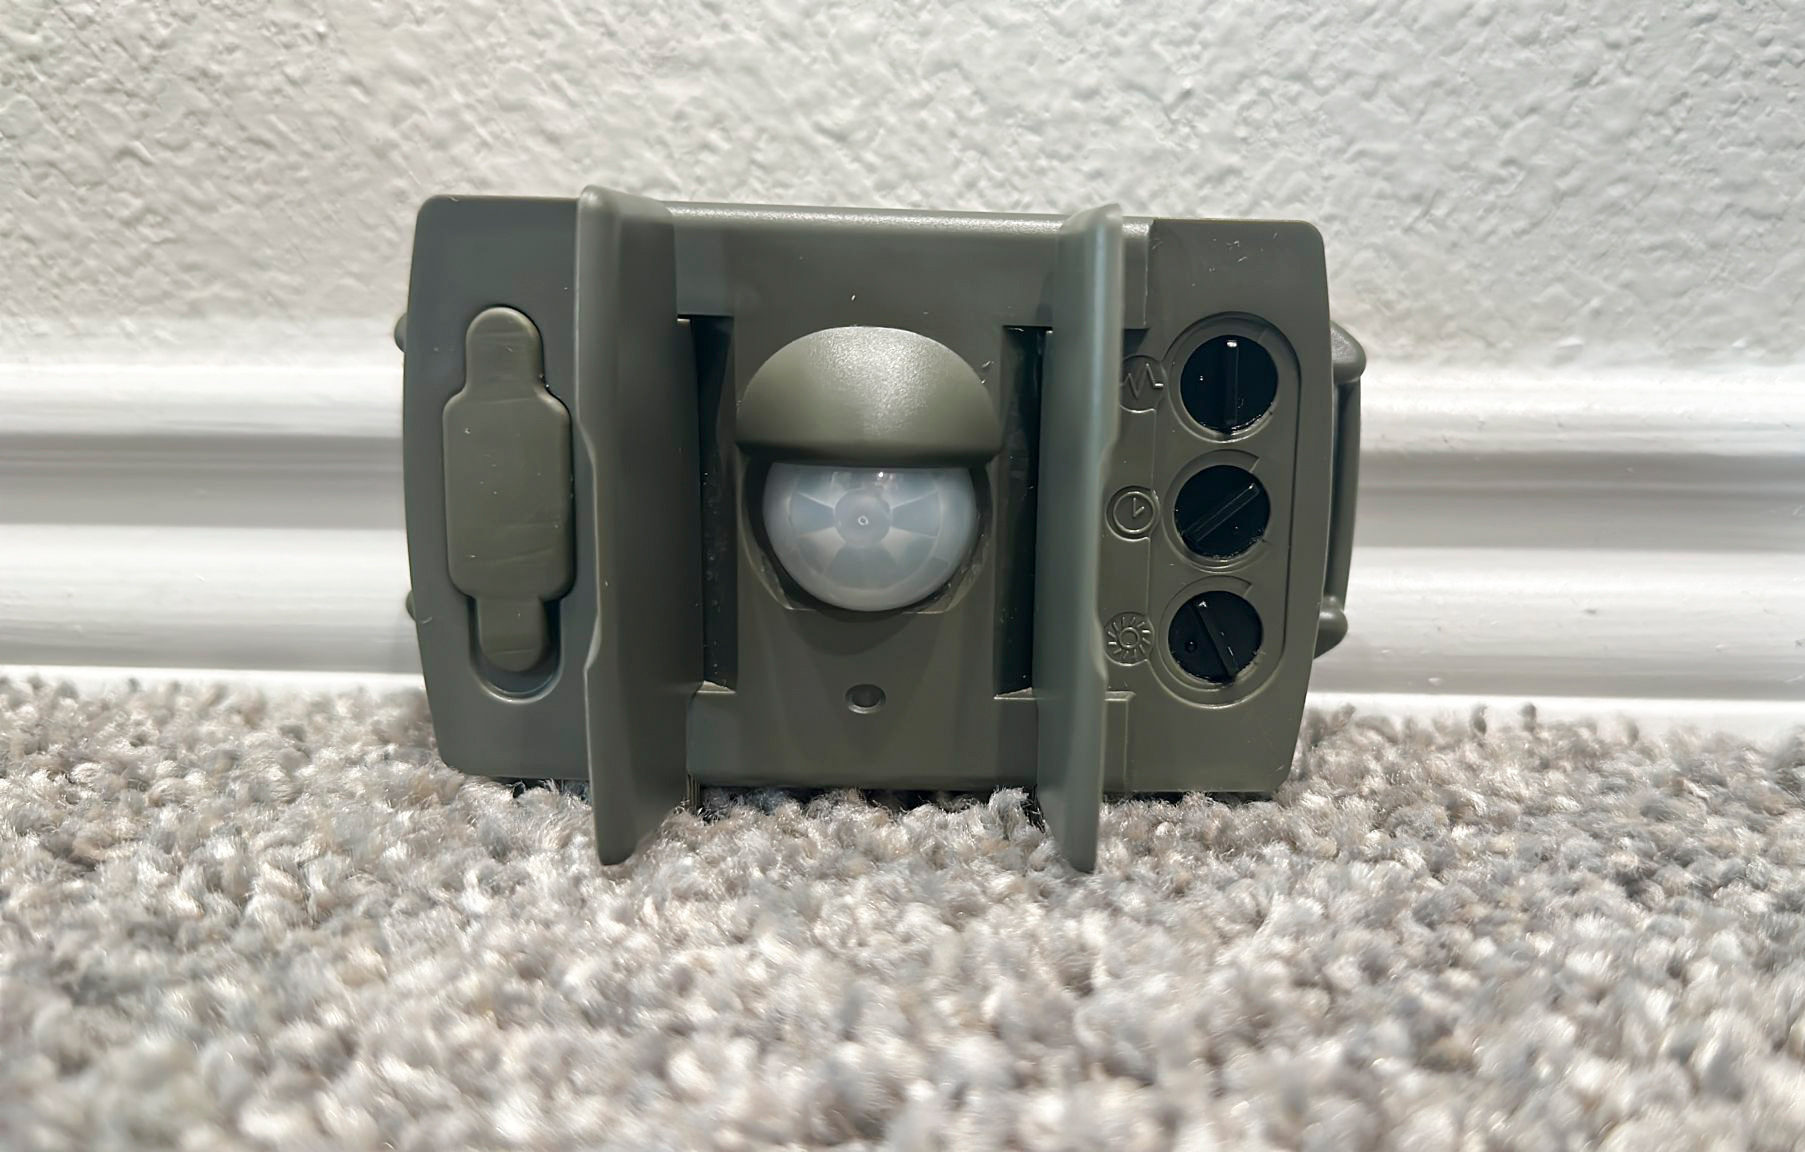
Passive infrared (PIR) sensor
Unlike PIRs, which cover a wide range, beam break sensors provide an extreme degree of accuracy, triggering at the exact spot you’ve focused on. They are also much less prone to false triggers by wind and sun. However, the wide range of the PIR can be helpful for certain subjects. PIR sensors are also less expensive, widely available, and easier to DIY.
The most commonly used PIR sensor for camera trapping is produced by Camtraptions. Cognisys, another camera trapping company, also makes PIRs known for their high degree of customizability. They also make AIRs designed for camera trapping that are the top choice for wildlife filmmakers.
These sensors can be connected to your camera in a wired or wireless format. Wired setups can limit placement options and are vulnerable to being chewed on by rodents. On the other hand, wired setups also have better battery life, but this issue can be compensated for in wireless setups by using external battery packs and other power sources.
Camera
Perhaps the most important part of your camera trap setup is the actual camera. The great thing about camera trapping is you don’t need high-end camera bodies and lenses. For my camera trap setups, I use old Nikon D600, Nikon D7200 and Nikon D3300 cameras.
Both DSLR and mirrorless cameras can be used for these kinds of setups, but DSLRs offer much more battery life, which is important if you hope to keep your camera out for extended periods of time. Even when kept in housing, these cameras can often be vulnerable to the elements, to animals or to theft, so using an expensive mirrorless camera can be a risk. I try to look for DSLRs that have good resolution (at least 20 megapixels) and dynamic range, but are not too expensive or high-end. Both full frame and APS-C sensors can work great for these kinds of setups.
Lens
In addition to a used camera, you will also need a wide-angle lens to capture images of the wildlife. A wide-angle lens is important because your camera will be fairly close to your subject, meaning your photographs will be taken at a low focal length. This wide-angle lens is also what allows for you to incorporate the surrounding environment into your image. Nikon 18-55mm f/3.5-5.6G VR II lenses are my go-to. The focal length range is perfect, the price is great and it captures very high-quality images.
Flash
Next, you need off-camera flashes, which provide light for the images during the night when natural light is low. Typically, at least two flashes are used per setup, placed in angles that light up the area where you’ve focused.
For camera trap flashes, you need flashes with a long standby time. This allows them to sleep when inactive, saving a lot of battery. The Nikon SB-28 is considered the best flash for camera trapping. It can go over a month in the field before running out of batteries. Find out more in our article covering the top Nikon flashes.
When placing flashes, keep them above your subject and at low intensity. This helps create more natural looking lighting for your photo. Contrary to common perception, most wildlife is not bothered by the soft flashing at all.
Lastly, one also needs to house the cameras and flashes to protect them from elements and curious animals. Cameras like Camtraptions and Cognisys sell housing, but you can also easily DIY it using a hard shell Pelican case.
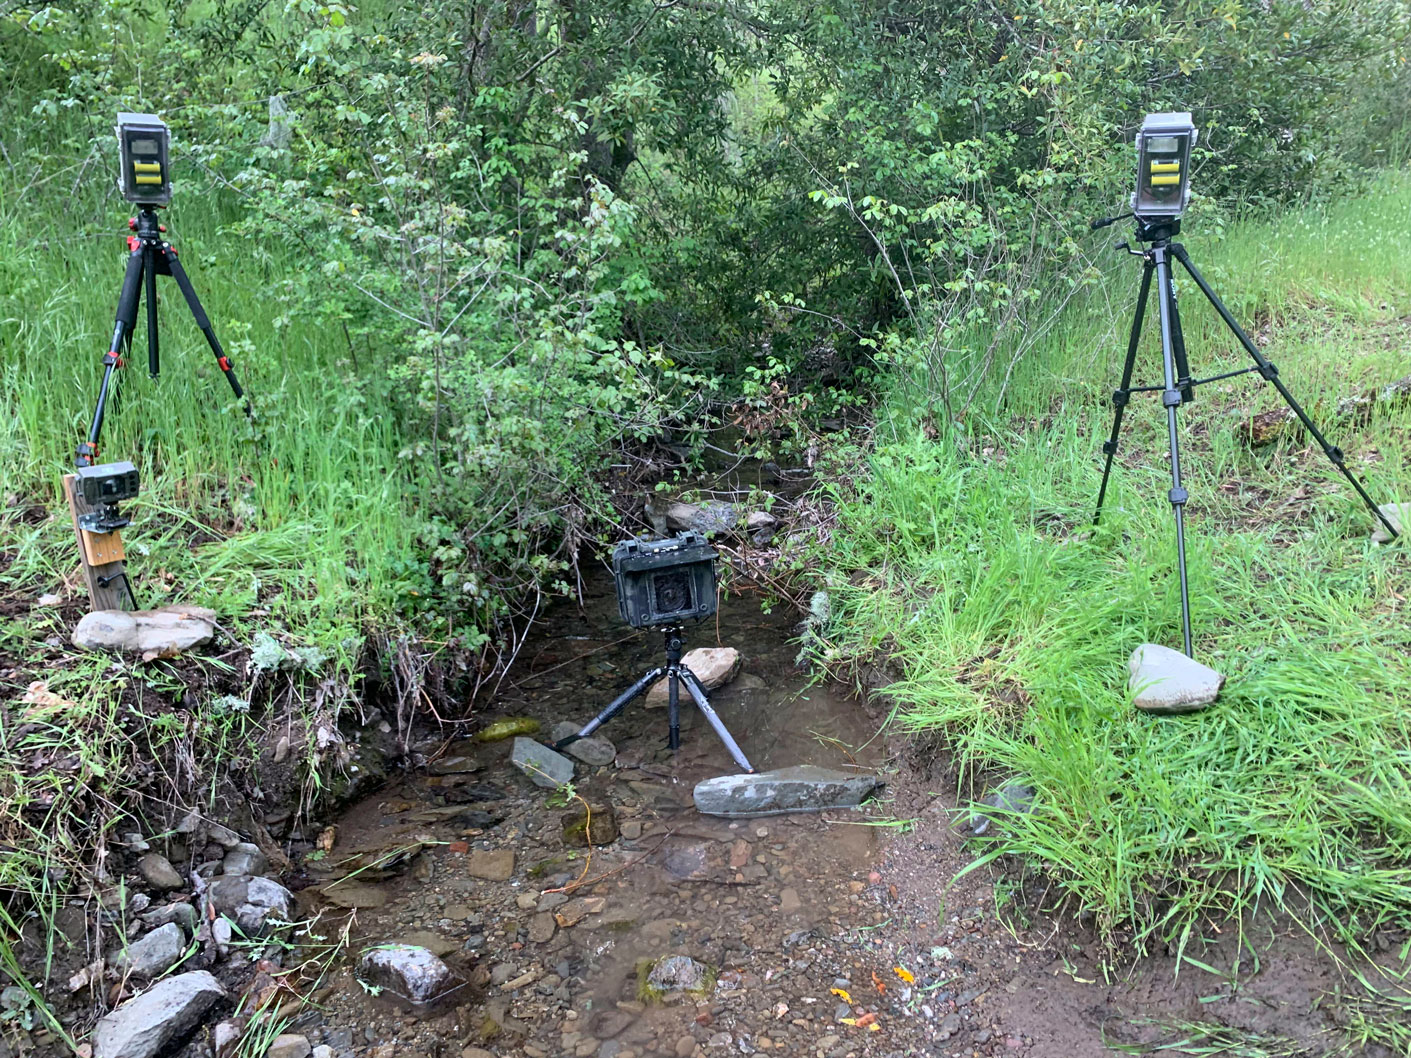
Camera trap setup in the field
Camera Trap Images of Animals
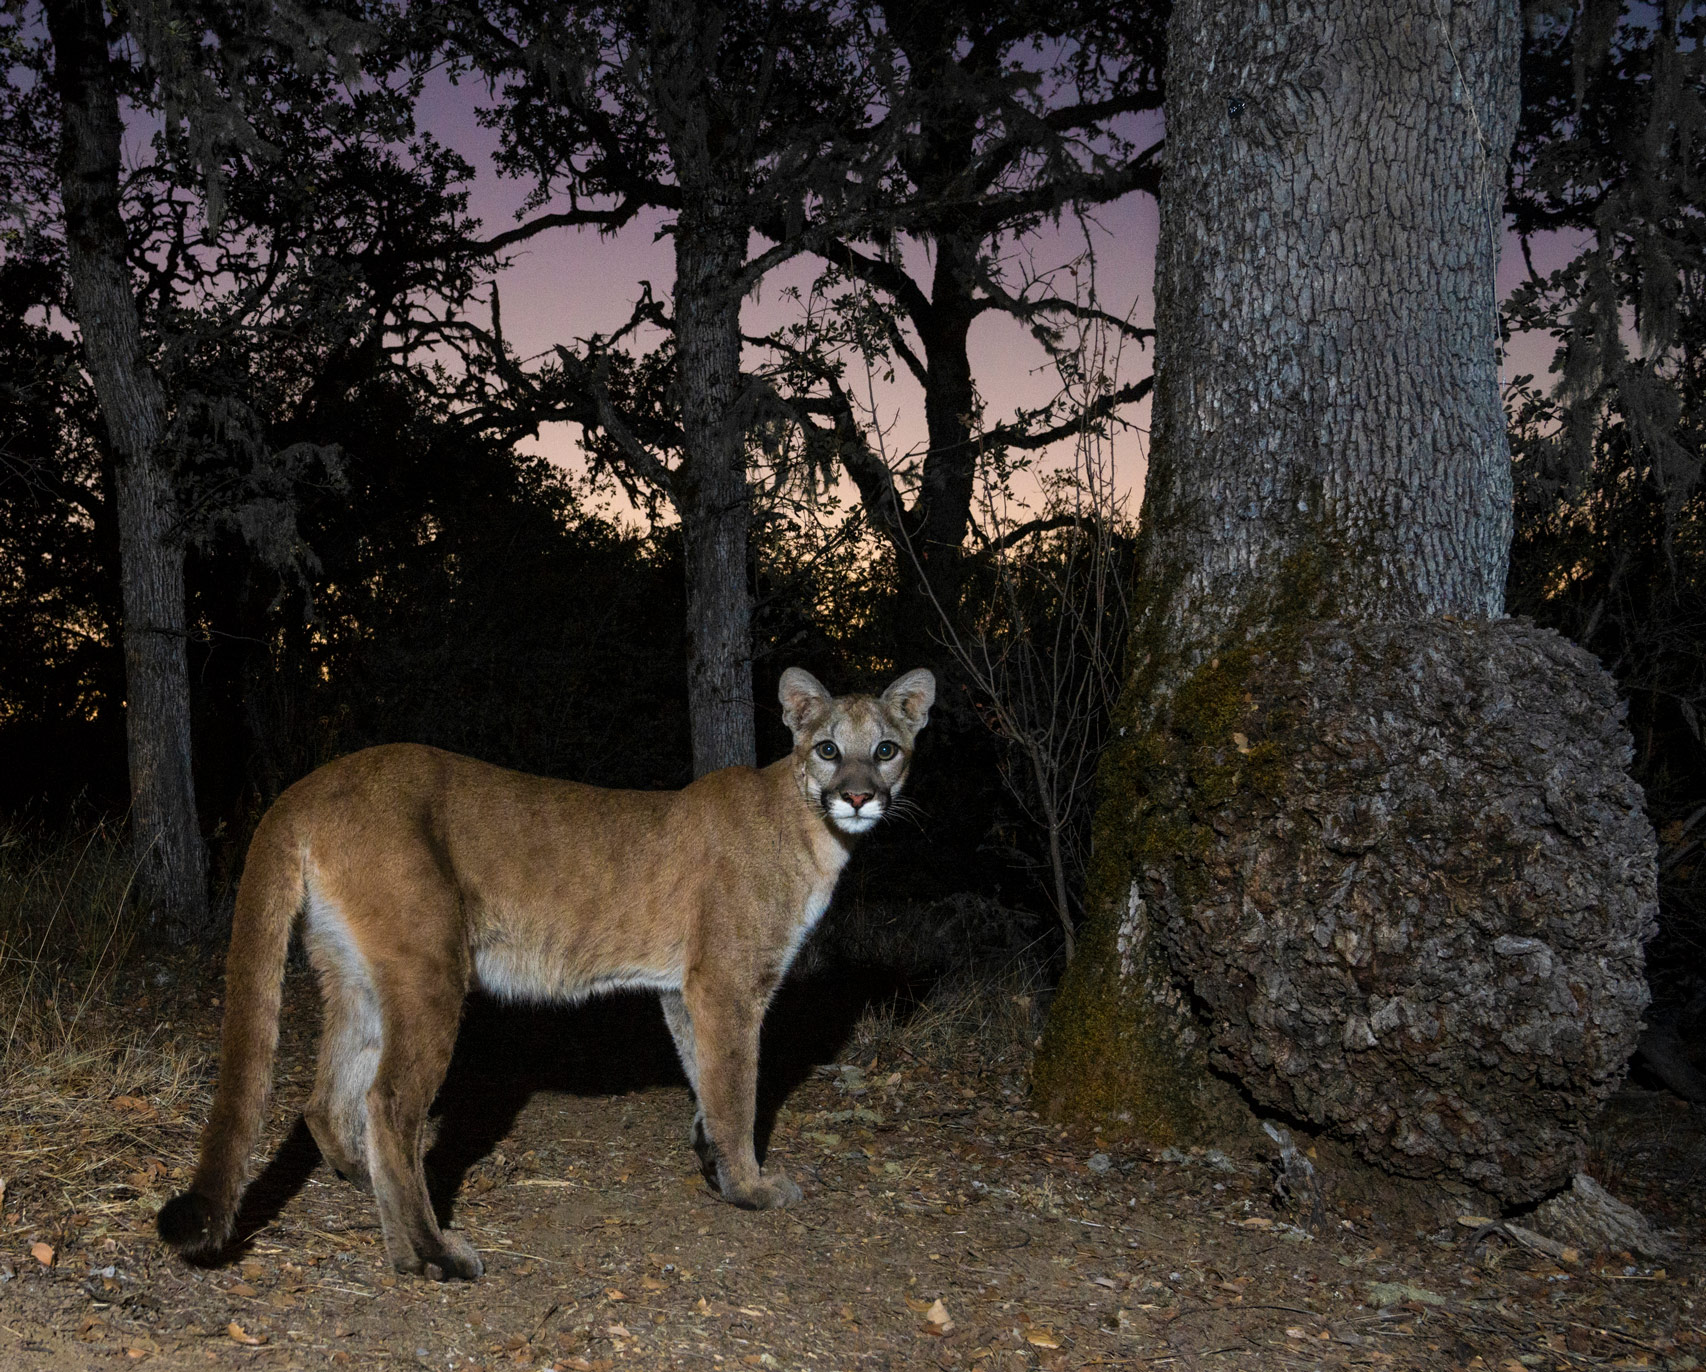
My three main camera trap projects so far have been documenting mountain lions in California, mesopredators (coyotes, bobcats, foxes) in California, and, the most ambitious of all, photographing a melanistic leopard in India.
My journey with camera trapping started with an effort to get high-quality photographs of wild mountain lions in my home state of California. A wildlife biologist at UC Berkeley tipped me off on a spot a few hours south of my home that had been receiving a lot of mountain lion activity. I went down there and set up my first camera trap, a long-term setup that would only be checked once every three to six weeks. After six weeks of patiently waiting, I returned to the spot, but had gotten no mountain lions.
After three more weeks, I returned to the site and was thrilled to see a mountain lion on my camera. But when I looked at the photo on the large screen, it had all sorts of issues. The camera triggered late, so the mountain lion clipped out of the frame. The lighting was overly harsh. And my camera was set up too high, creating an awkward downward-facing angle.
Vishal Subramanyan | Nikon D600 | Nikon AF Nikkor 24-85mm f/2.8-4D IF | f/10 | 1/125 | 28mm | ISO 720
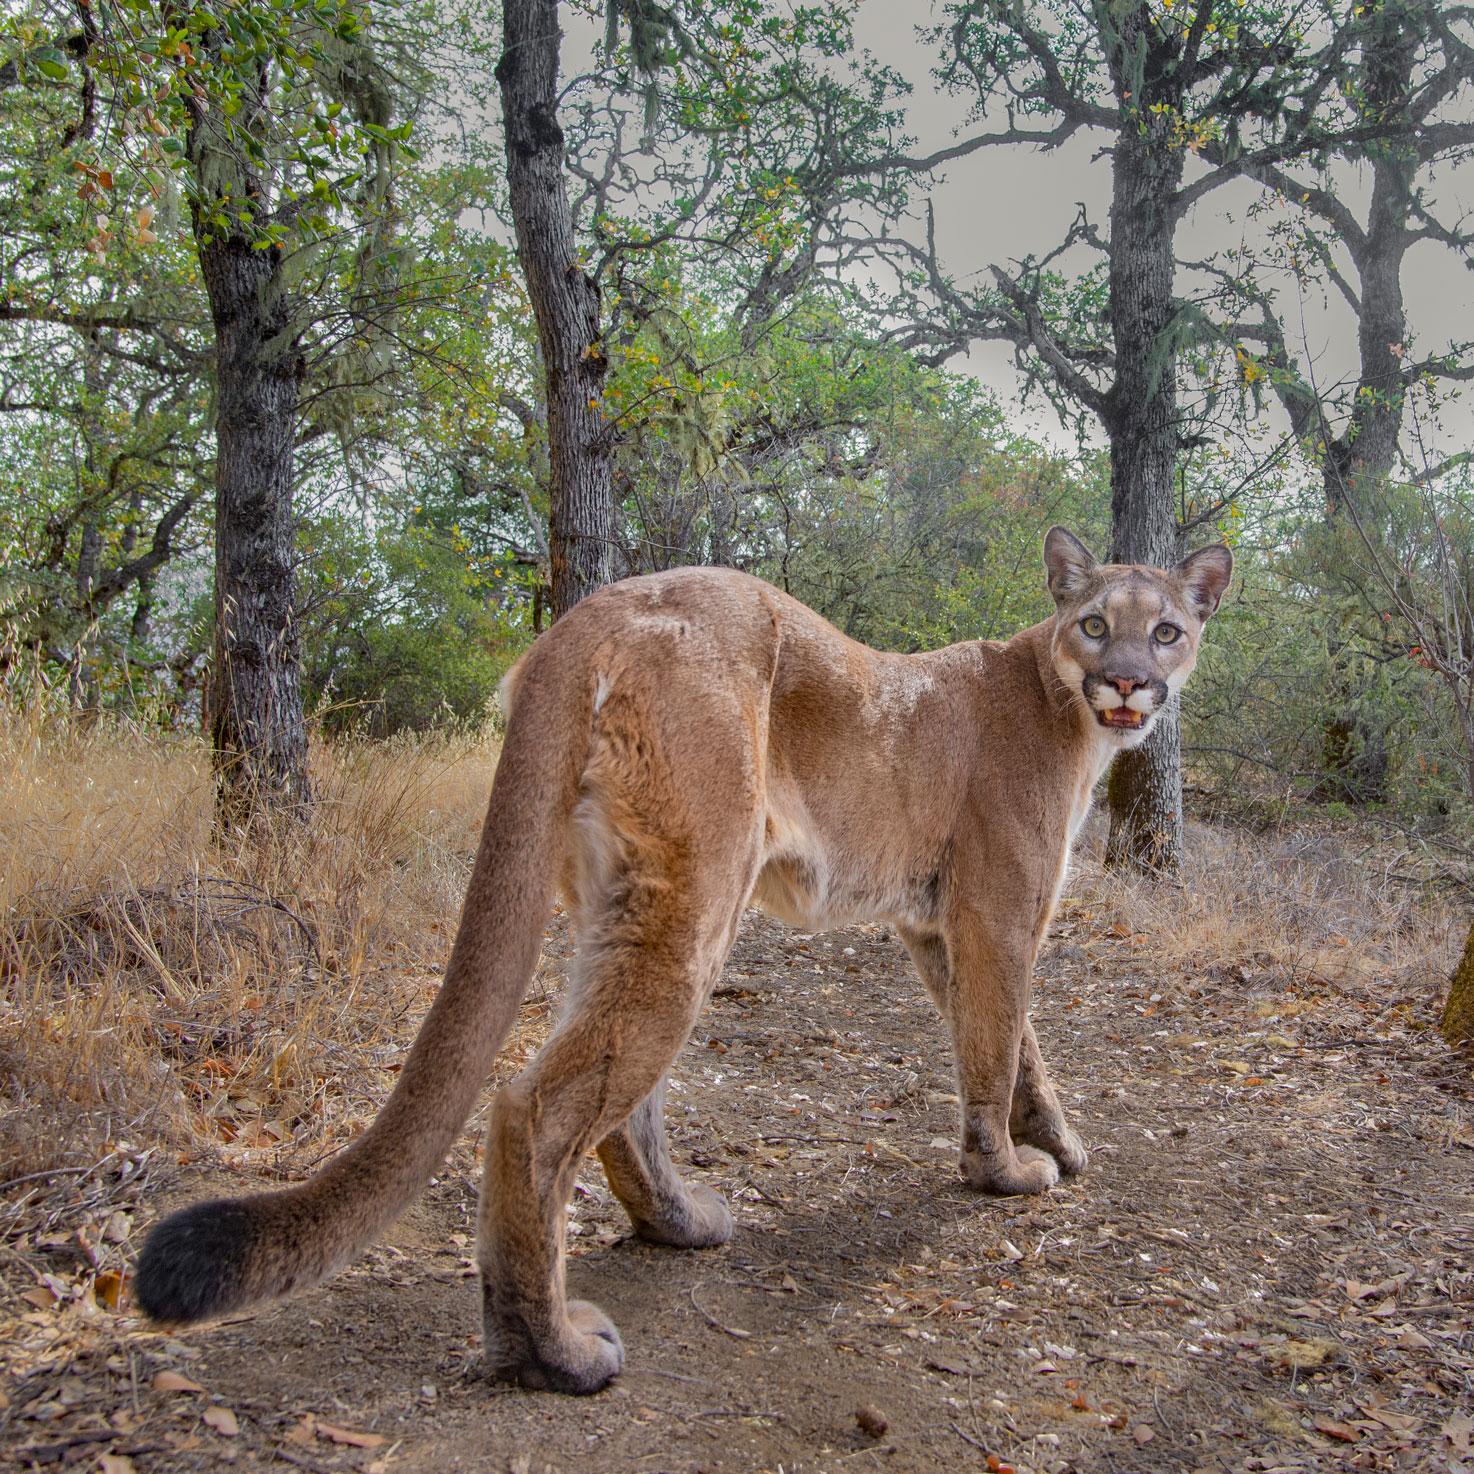
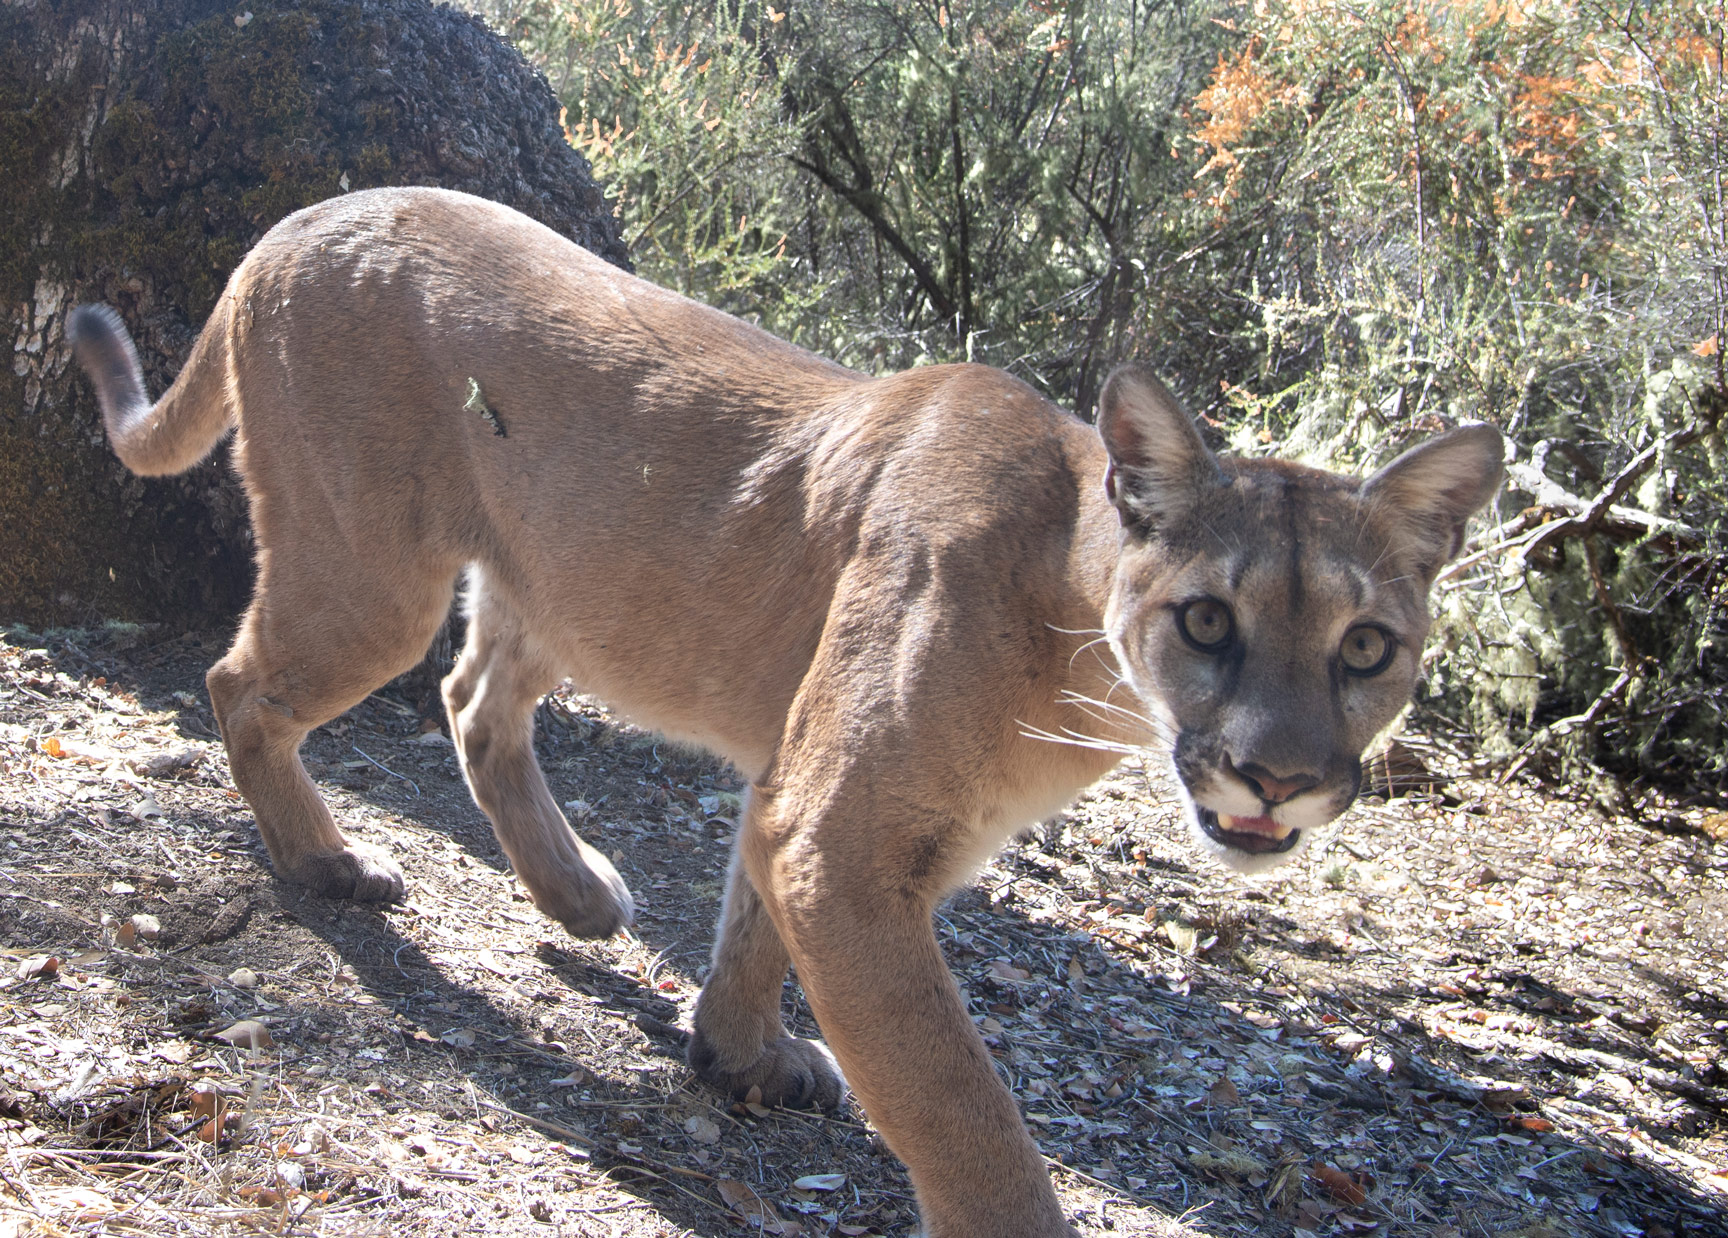
After readjusting these settings and issues, I left the site, eagerly awaiting the next lion visit. After another three weeks, I excitedly went to check the camera again, and was shocked to see mountain lions had visited five times. It took over five months, but I finally got my dream photo of a young mountain lion as he paused in front of the camera at sunrise.
Vishal Subramanyan | Nikon D600 | Nikon AF Nikkor 20-35mm f/2.8D | f/10 | 1/160 | 30mm | ISO 1250
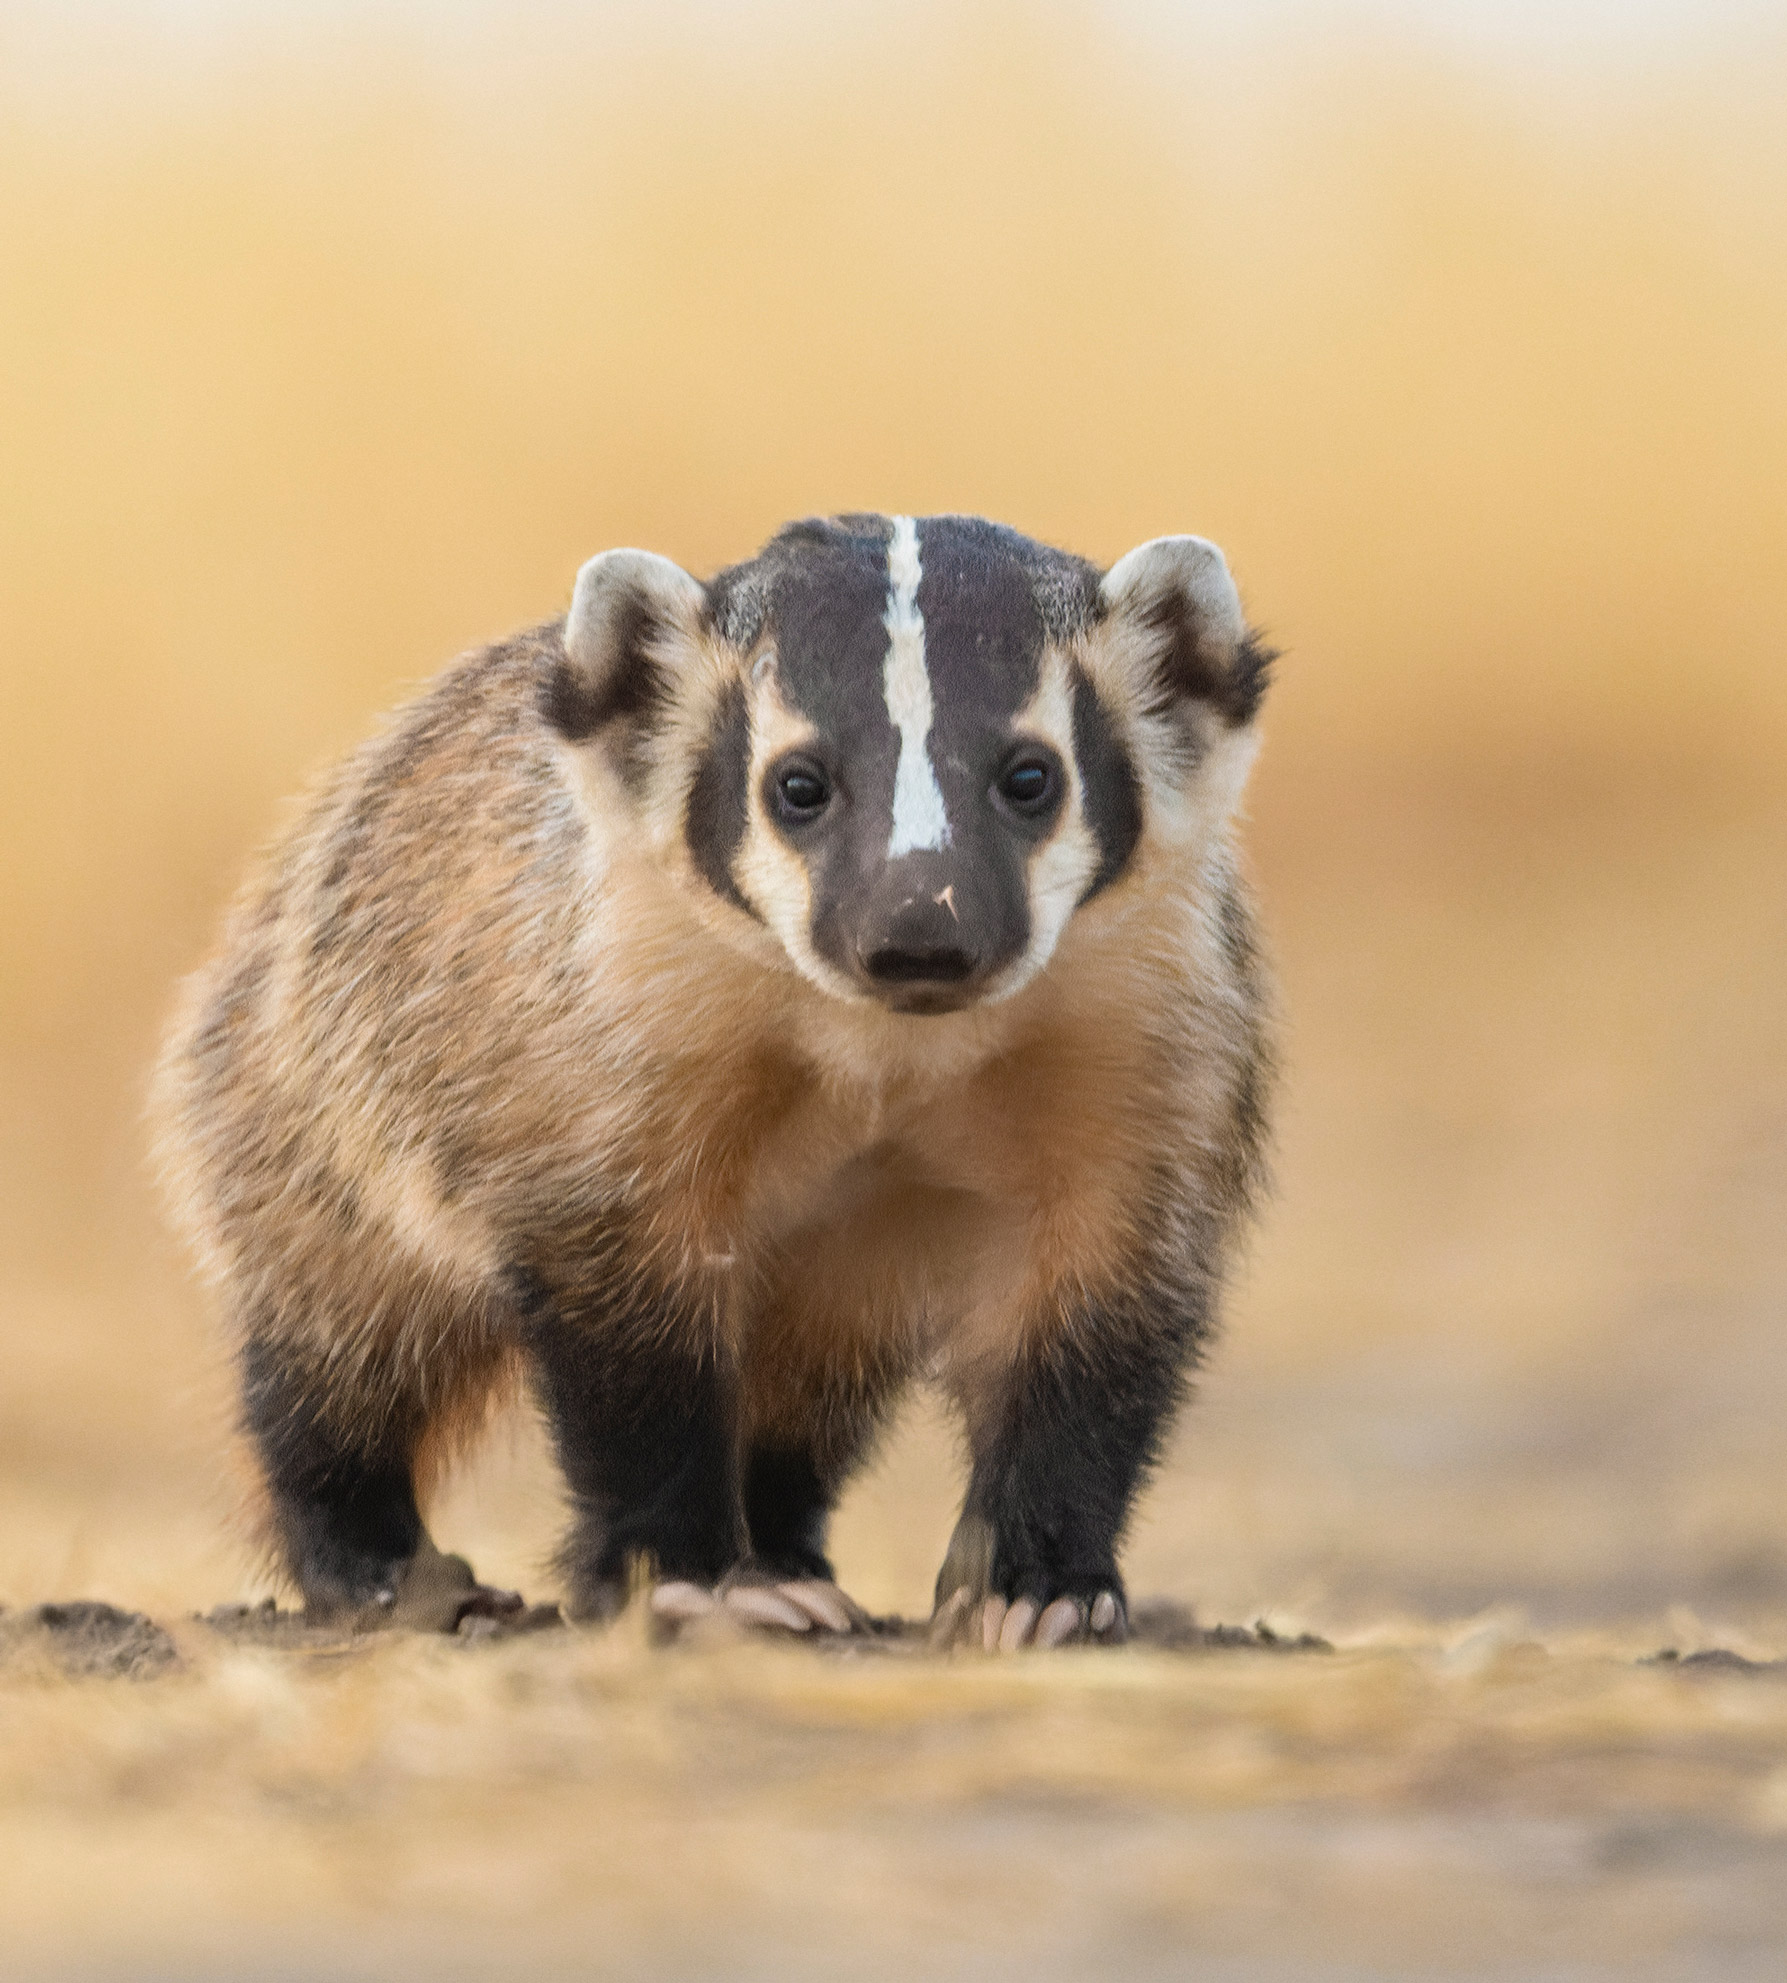
My next project involved capturing smaller predators like bobcats, coyotes and gray foxes. Around the same time I set up for the mountain lions, I found a game trail along a creek that was being heavily trafficked by these animals. I set up my second DSLR camera trap there and the wait began.
Unlike mountain lions, who usually pass by a spot with a frequency of once a month, these animals visited my camera more often. Instead of a game for patience, this project was all about adjustment. Since the animals passed by the camera so frequently, it gave me time to fine tune everything to perfection. I would check this camera every two weeks, adjusting flash powers, moving the camera and changing the focal point to help perfect the image. Throughout this time, the various adjustments I made to my setup allowed me to capture many images of coyotes, bobcats and gray foxes from unique perspectives.
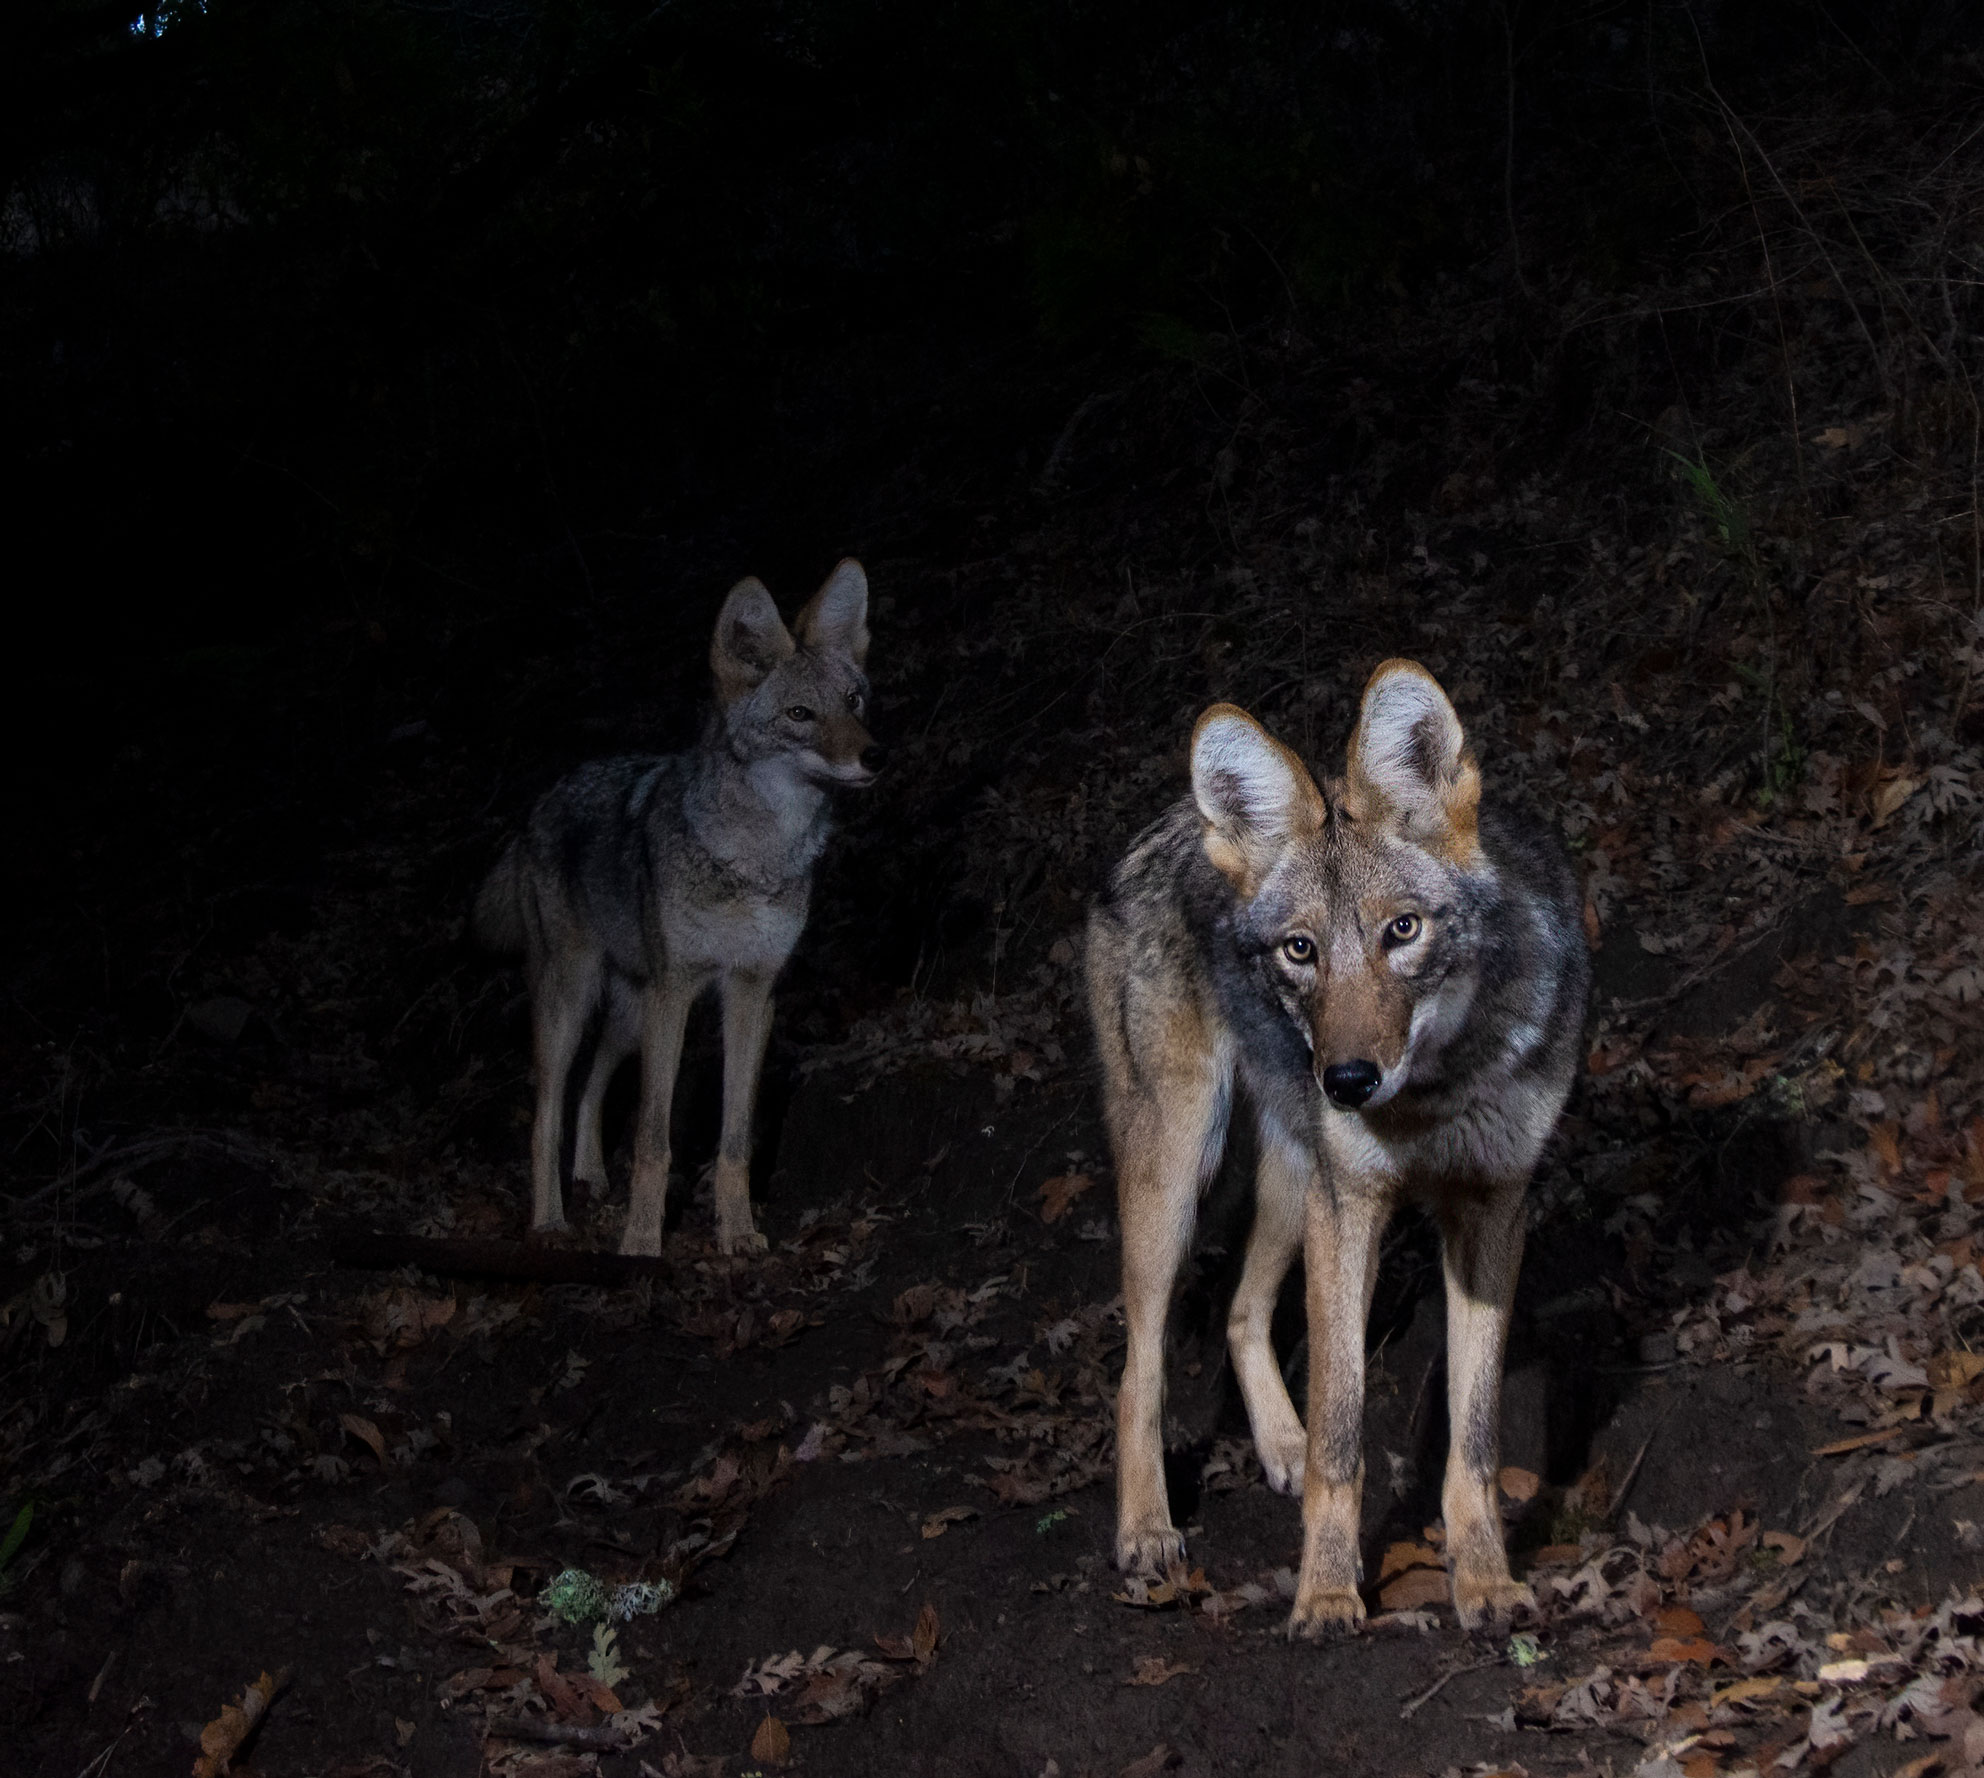
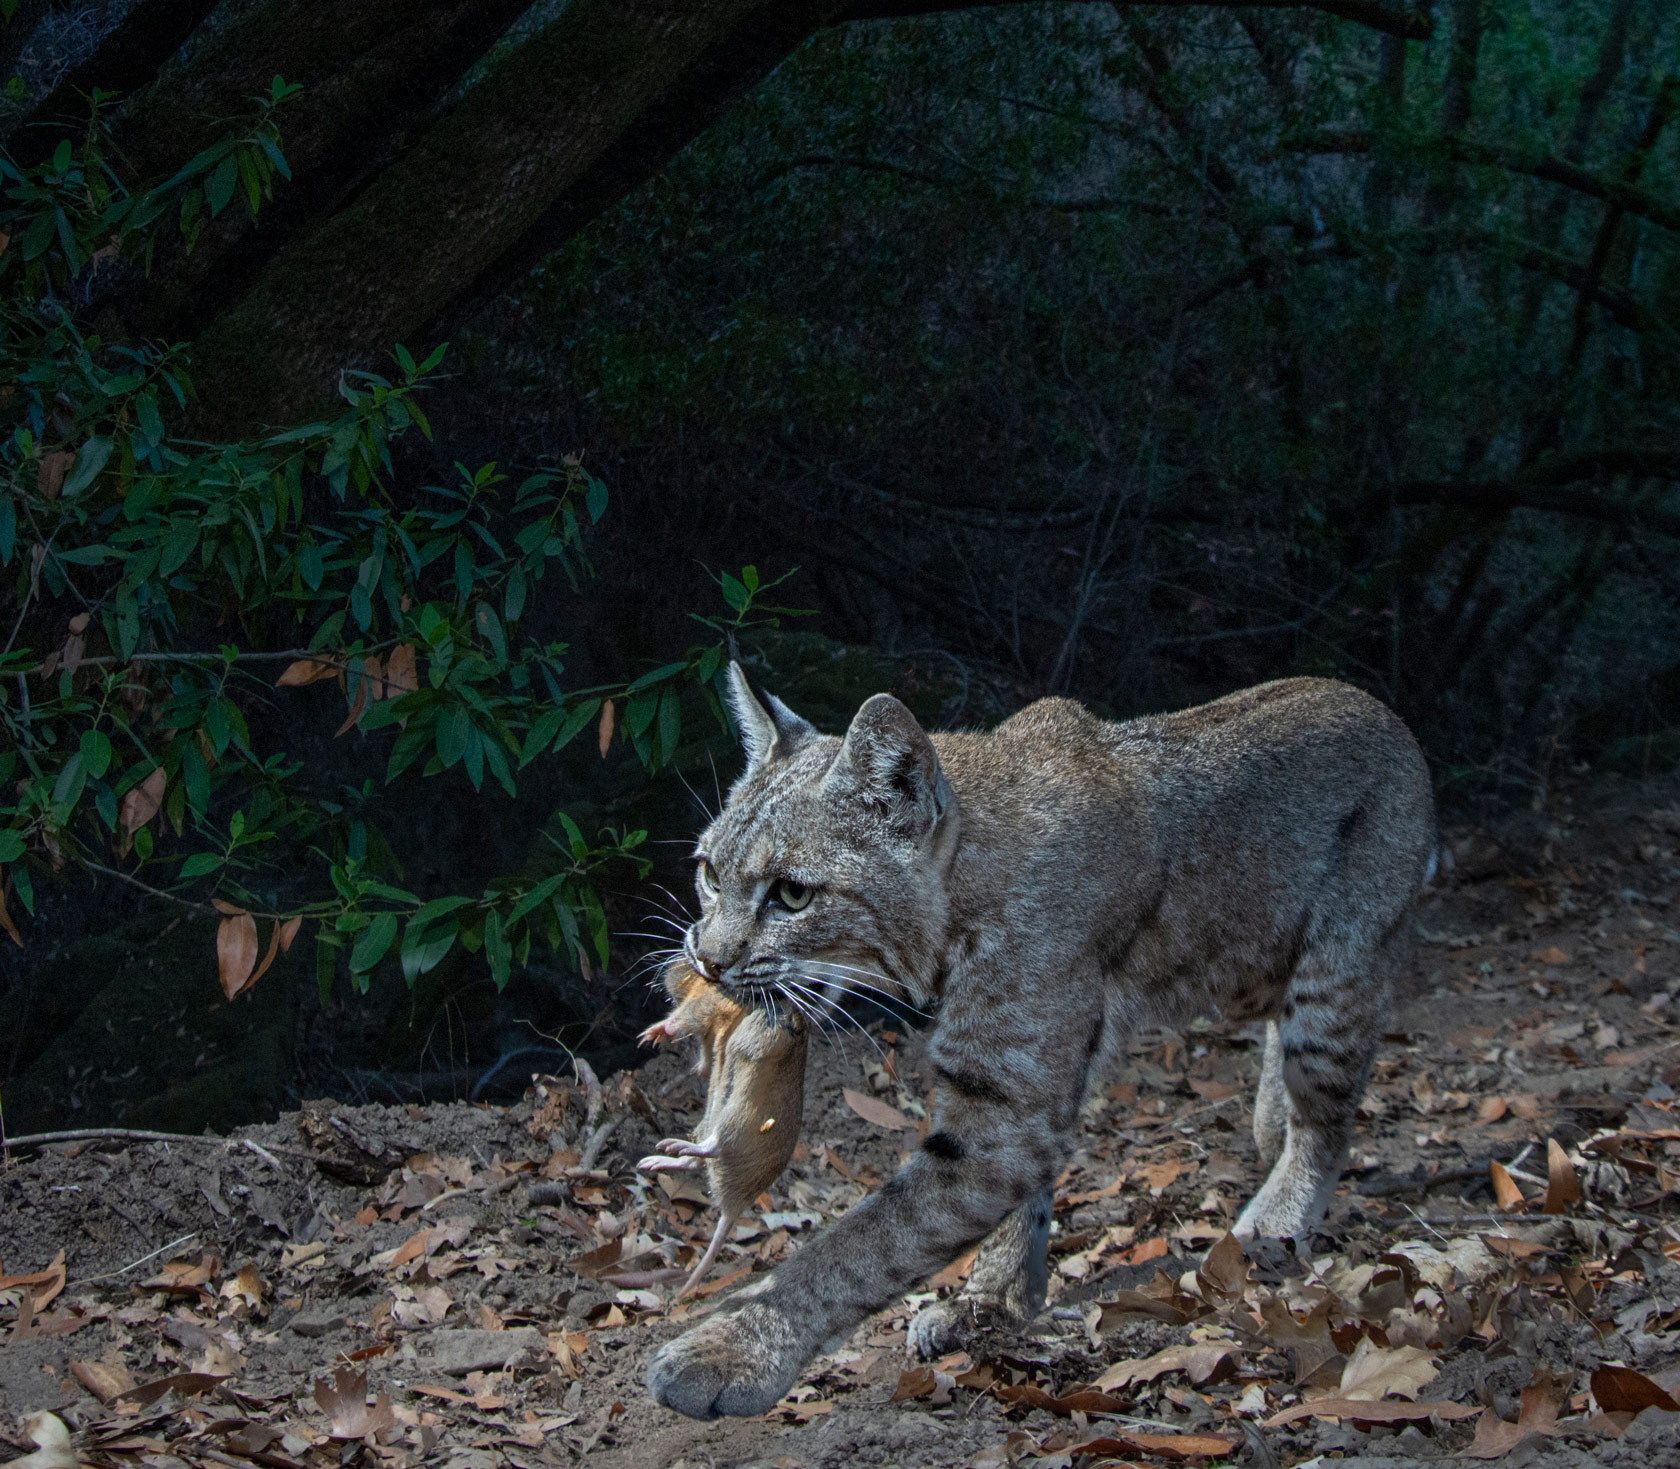
Vishal Subramanyan | Nikon D7200 | Nikon AF Nikkor 24-85mm f/2.8-4D IF | f/10 | 1/125 | 24mm | ISO 800
After three months of working on this project, I took this camera setup down for my most ambitious project yet. I was invited to a private tea estate in South India for 10 days to attempt to camera trap one of the most beautiful and elusive creatures — a melanistic leopard. I came equipped with both my DSLR camera traps and several more scouting trail cameras.
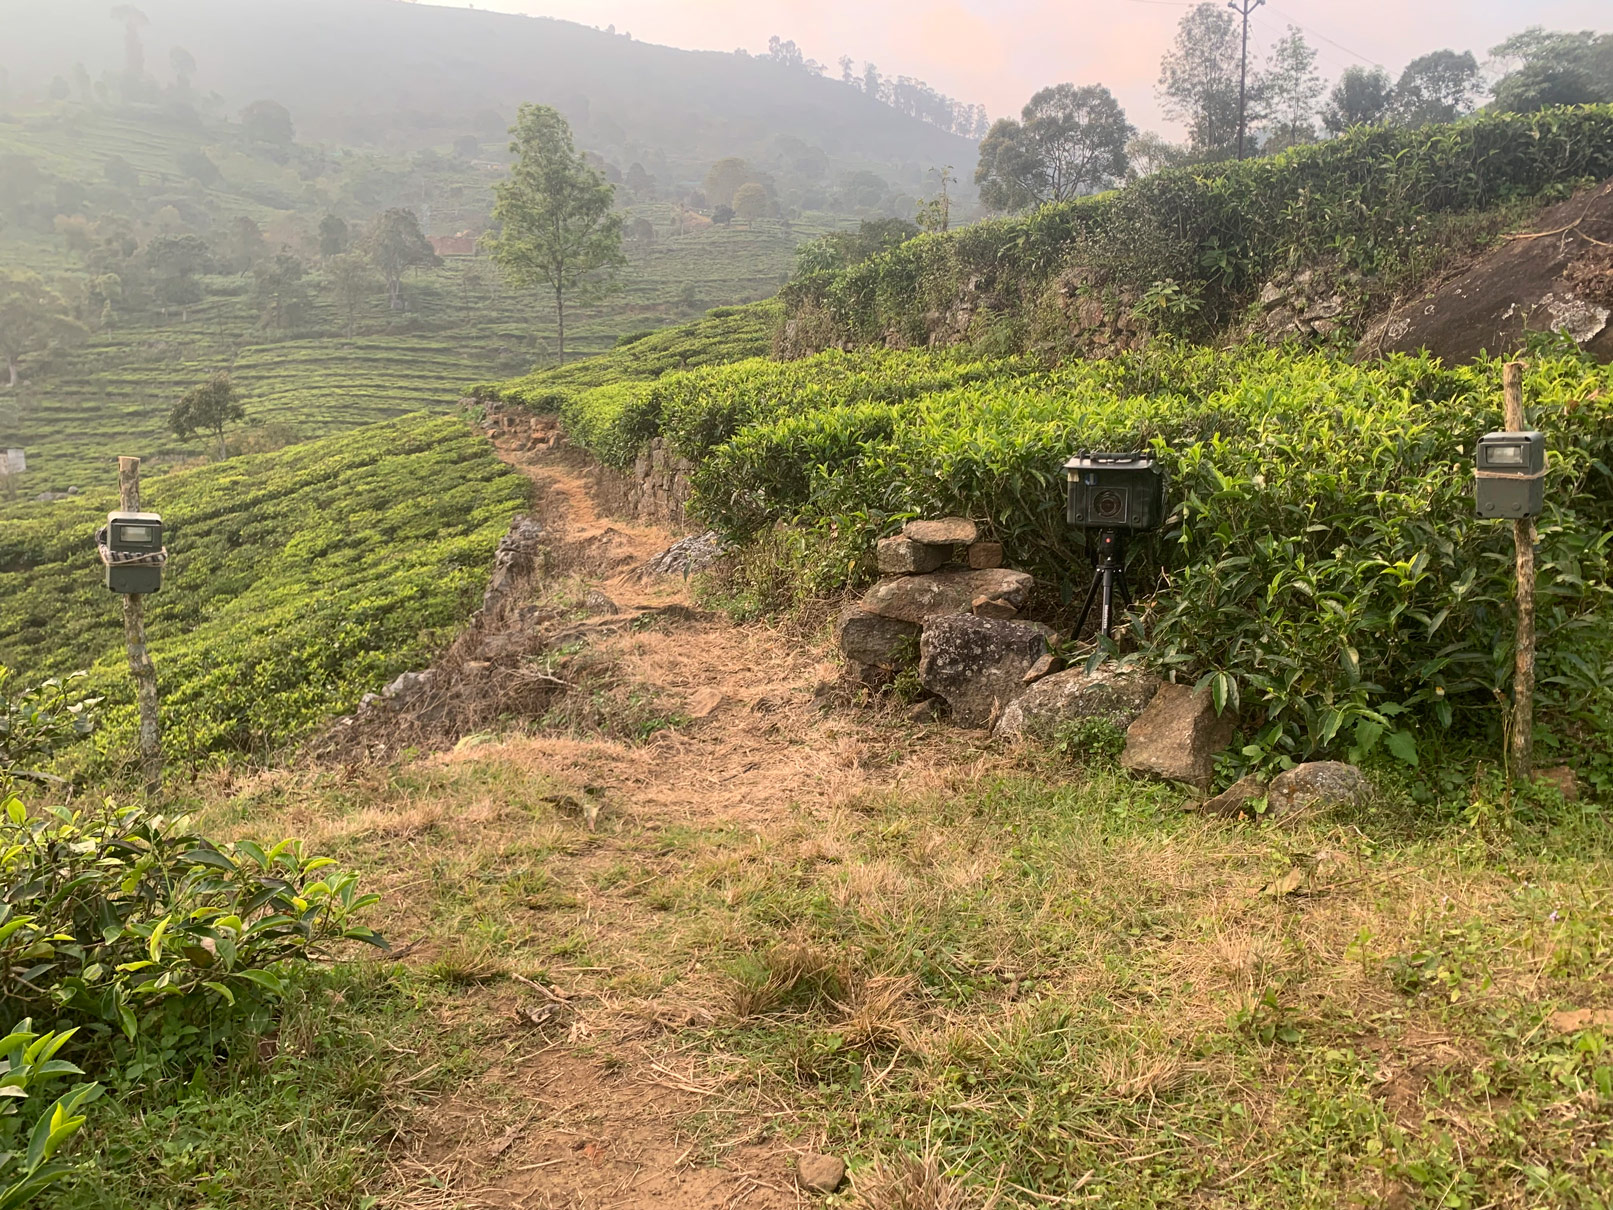
This project was difficult simply because of the time restriction of 10 days. Unlike my long-term deployments in California, I checked these camera setups every day for the duration of my time on the tea estate. After the first eight days, I had captured just one image of a porcupine. On the ninth day, a sloth bear family visited, but still no leopard. I was beginning to lose hope.
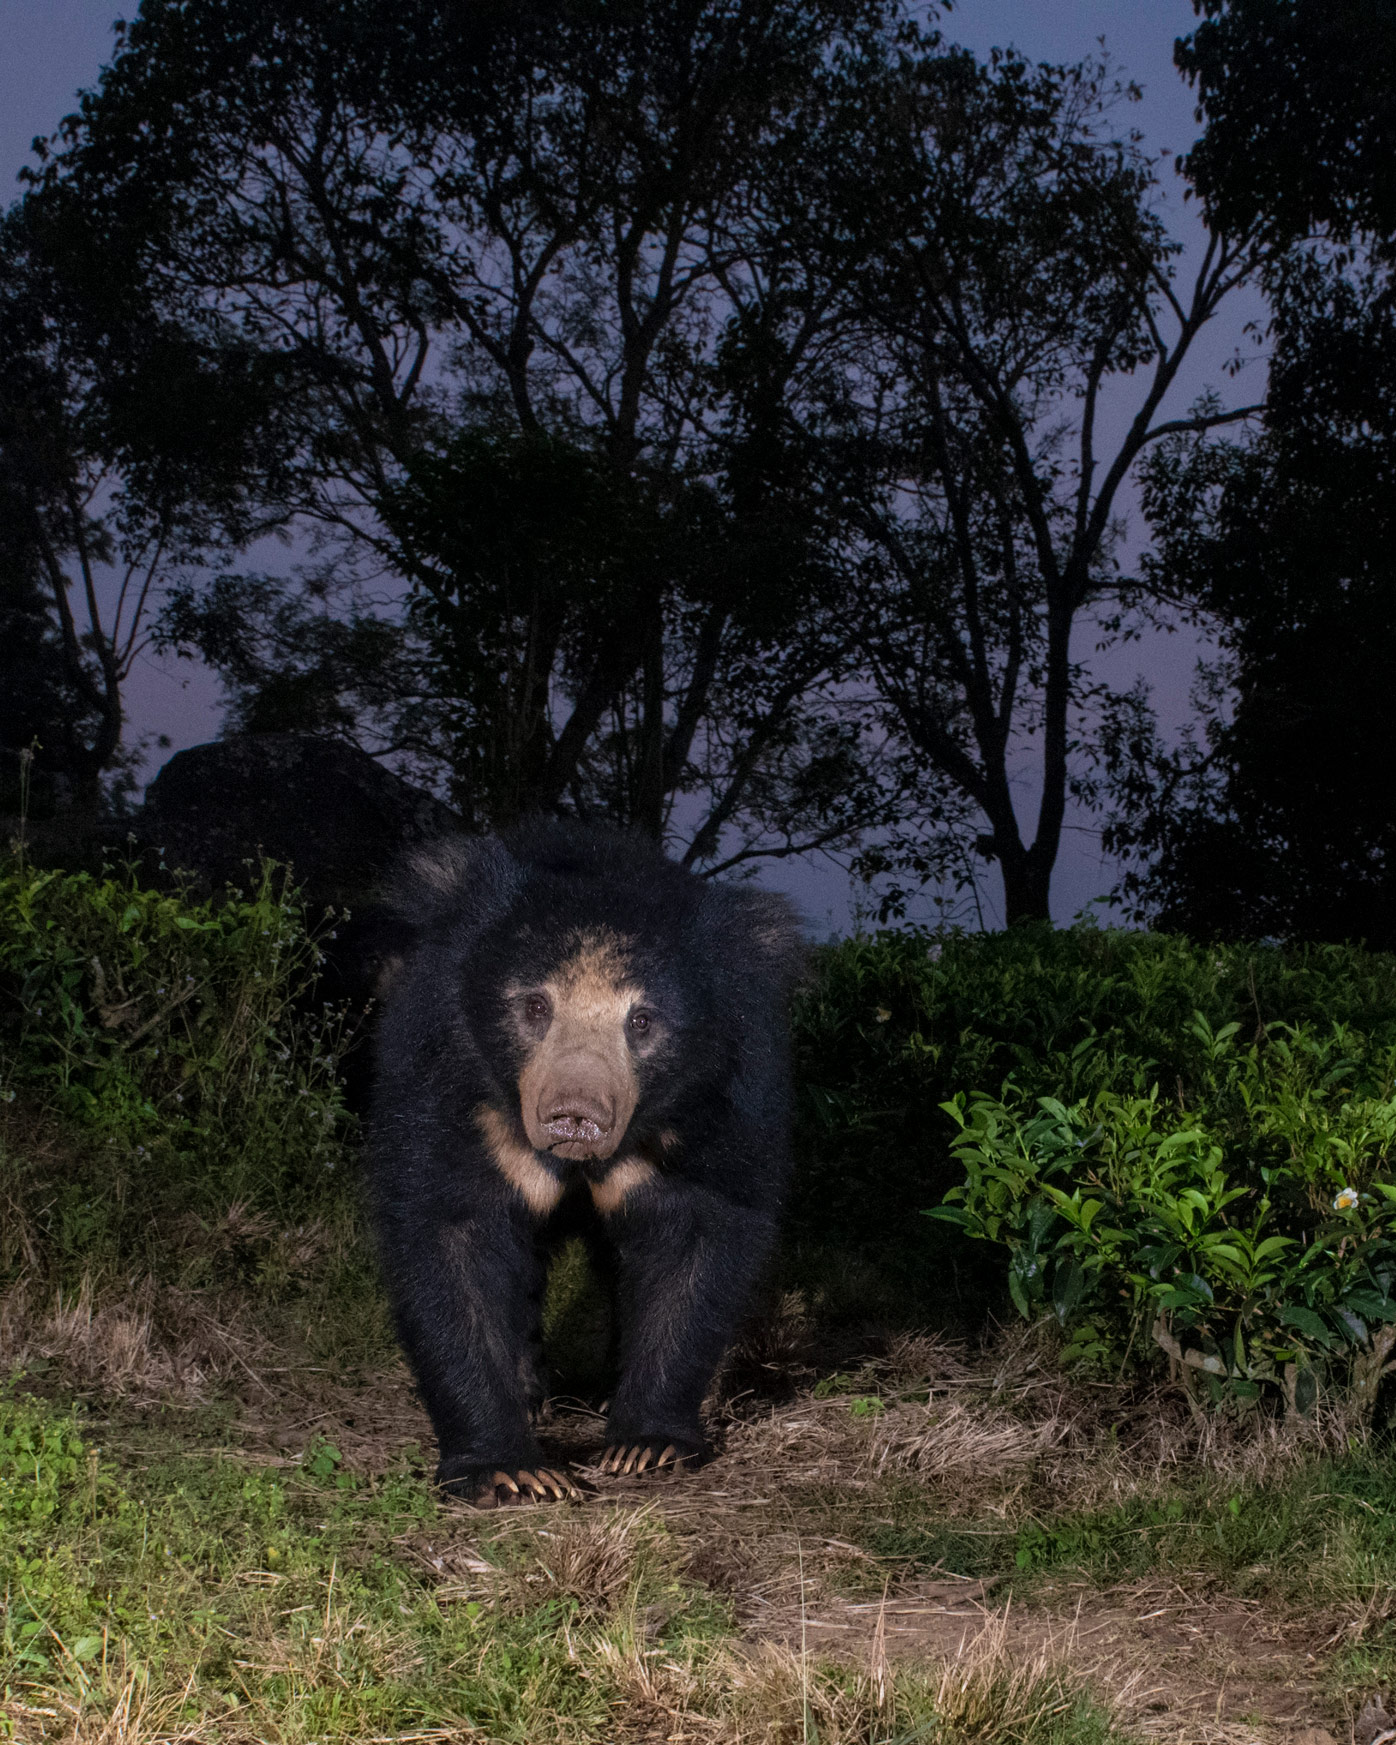
Vishal Subramanyan | Nikon D3300 | f/10 | 1/200 | 18mm | ISO 1600
On the last morning before sunrise, I went to gather the camera before my ride back to town. As I scrolled through the photos, I discovered that the melanistic leopard had visited only a few hours earlier! It was an absolutely amazing experience to capture this elusive animal on camera.
While camera trapping has its ups and downs, it can be a rewarding, low-cost and non-intrusive way to capture images of animals in their natural habitats.
Thanks, Vishal, for this guide to wildlife camera traps. For more of his work, visit @vishalsubramanyan.
FAQ
How do wildlife camera traps work?
Wildlife camera traps are an effective way to see what animals are roaming around when no one’s watching. They’re motion-activated cameras that snap photos or record videos whenever something moves in front of them. Most camera traps use infrared sensors, which means they can pick up heat and motion, even in the dark, so you can catch animals when they are most active at night.
These cameras are usually strapped to a tree or placed on a stable surface in spots where animals are likely to pass by, such as by trails, water holes, or near food sources. Once set up, they’ll quietly do their job without disturbing the wildlife.
Camera traps are great for getting a peek into the secret lives of animals—whether you're a nature lover, a backyard explorer, or a budding conservationist. They’re also useful for tracking patterns, learning animal behavior, or just having fun seeing who shows up in your little corner of the wild.
What triggers a camera trap?
Camera traps are triggered by movement and heat. Essentially, simply anything that passes in front of them and gives off a heat signature. Most camera traps use a built-in motion sensor called a passive infrared sensor (or PIR for short). When something warm, like an animal, moves through the sensor’s detection zone, the camera automatically snaps a photo or starts recording a video.
This combination of motion and heat helps reduce the number of false alarms from things like leaves blowing in the wind or shadows shifting – though it’s not foolproof. That’s why placement is key. A well-positioned camera is more likely to pick up real wildlife activity and less likely to waste battery or memory on empty shots.
Some more advanced camera traps also offer time-lapse or scheduled recording options, but for most setups, it’s just the heat and movement combination that does the trick.
What are the disadvantages of camera traps?
While camera traps provide a great opportunity to get a glimpse of wildlife, they’re not perfect.
A big challenge is false triggers. Camera traps can sometimes snap photos of things like wind-blown branches, falling leaves, or changes in sunlight, filling your memory card with empty shots. On the flip side, they might miss fast-moving animals if the motion sensor isn’t quick enough or properly positioned.
Another consideration is battery life and storage. If the camera is in a remote spot, it can be a hassle to go back and check or replace batteries and memory cards. Plus, cold weather can be tough on gear—rain, snow, or even extreme heat can damage equipment if it’s not built well enough to handle the elements.
Lastly, there’s always a small risk of theft or tampering, especially in areas where other people might come across your setup. But with a little planning and the right gear, most of these issues can be worked around.
This article is part of the MPB Guide to Wildlife Photography and Videography, our comprehensive look at how to create wildlife imagery, with camera recommendations, advice and interviews with experts.

Selected: Top Camera Gear for Wildlife Photography
Check out the best camera gear for wildlife photography, with options for any budget and level of expertise.
In the Field: Nikon Z9 | Moving to Mirrorless for Wildlife
Conservation biologist and wildlife photographer Lara Jackson reviews the Nikon Z9 after using the Panasonic DMC-FZ330 and Canon EOS 750D.
You can sell or trade your camera gear to MPB. Get a free instant quote, free insured shipping to MPB, and get paid within days.